This is a live build log for our own fourth-generation Toyota Sienna (2021–present) camper conversion — not a finished how-to.
The Build progress section is updated as each piece gets made, and photos go up as the work happens.
The parts list is everything actually bought for the build, with the price paid, so you can see what a conversion like this really costs before you start one.
Nothing here is engineering advice. Anything that restrains weight in a moving vehicle is safety-critical — verify it against your own vehicle.
Project S'mores · Build Log
Work in progress
A modular, no-drill 4th-gen Toyota Sienna camper conversion
Two people, one fourth-generation Toyota Sienna (2021–present), the second-row seats out and the third row folded flat. Three lift-out plywood modules clamp into one rigid deck: a compressor fridge and a slide-out camp kitchen pulling straight out the open tailgate, a full-length bed over deep storage, and an EcoFlow battery stack running all of it. Not a single new hole in the vehicle — everything anchors to factory seat rails and cargo hardpoints.
This page grows as the build does. Below: what's finished so far, shop photos, and the complete parts list with what every piece actually cost.
Updated as work gets done — last updated September 11, 2026.
0of 0 stages done0%complete
From the shop
Real photos from the build, added as it goes — a first look at the galley,
the leveling legs, Panel A's frame coming together on the garage floor, both sheets of plywood
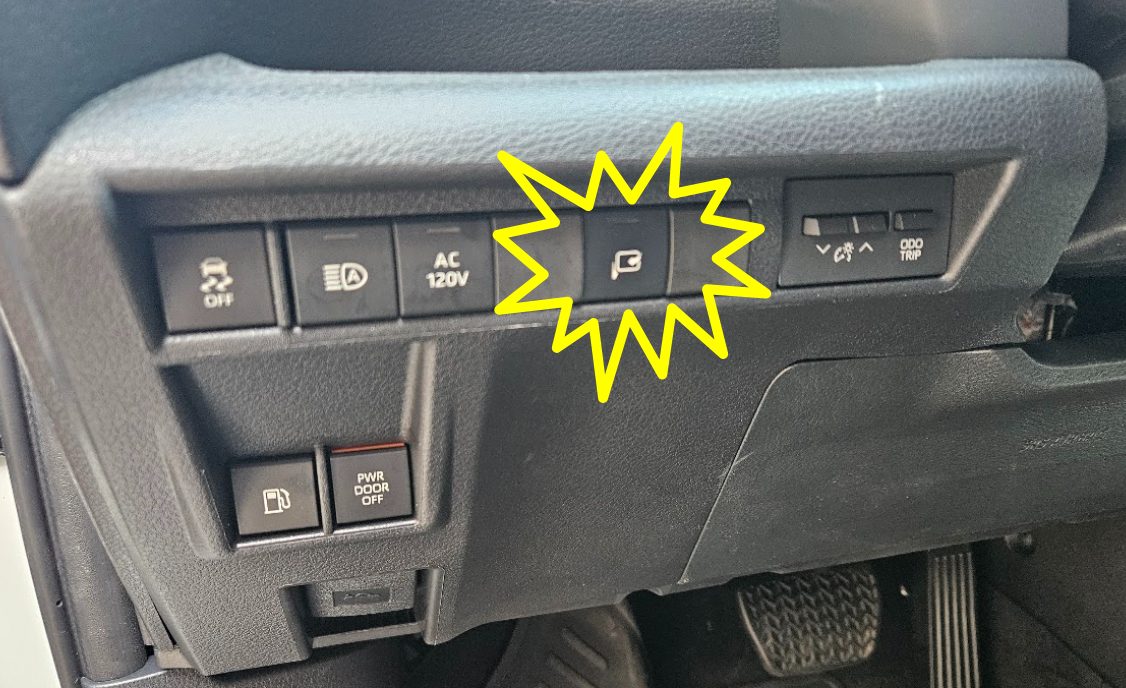
broken down into every part the build needs, the dash switch from the power-folding mirror retrofit,
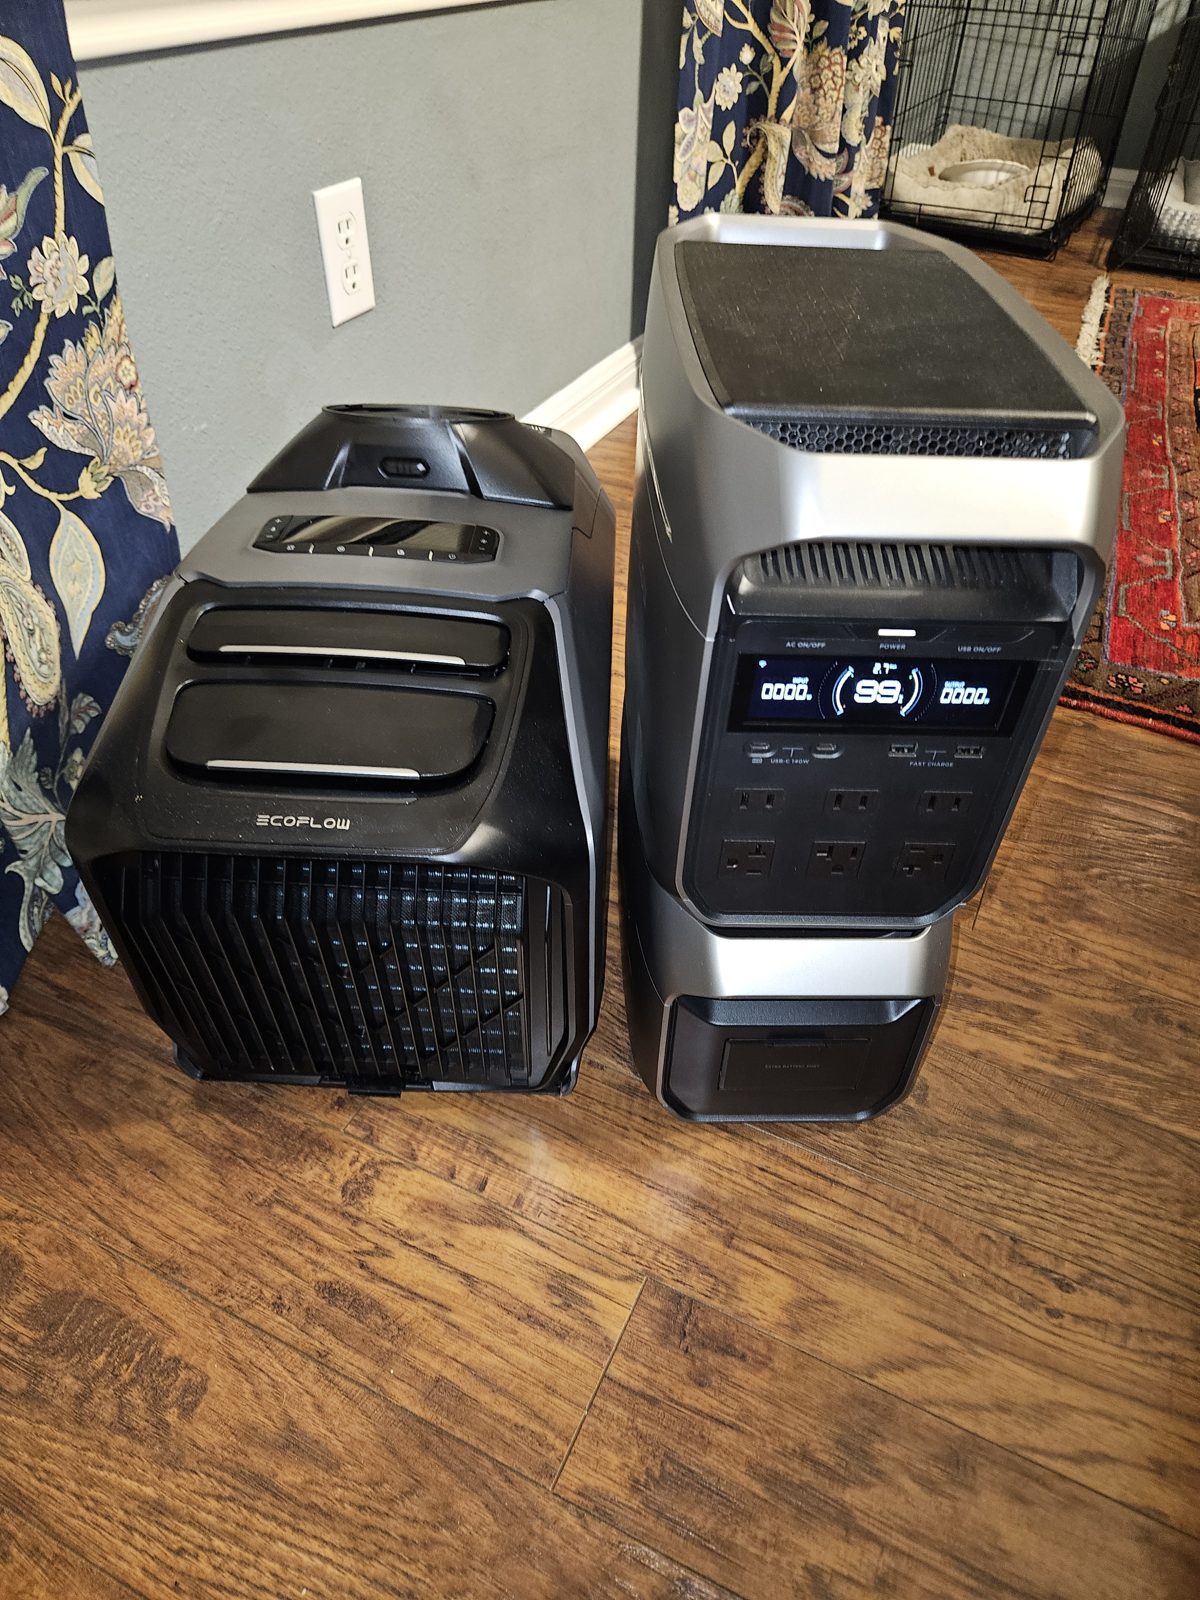
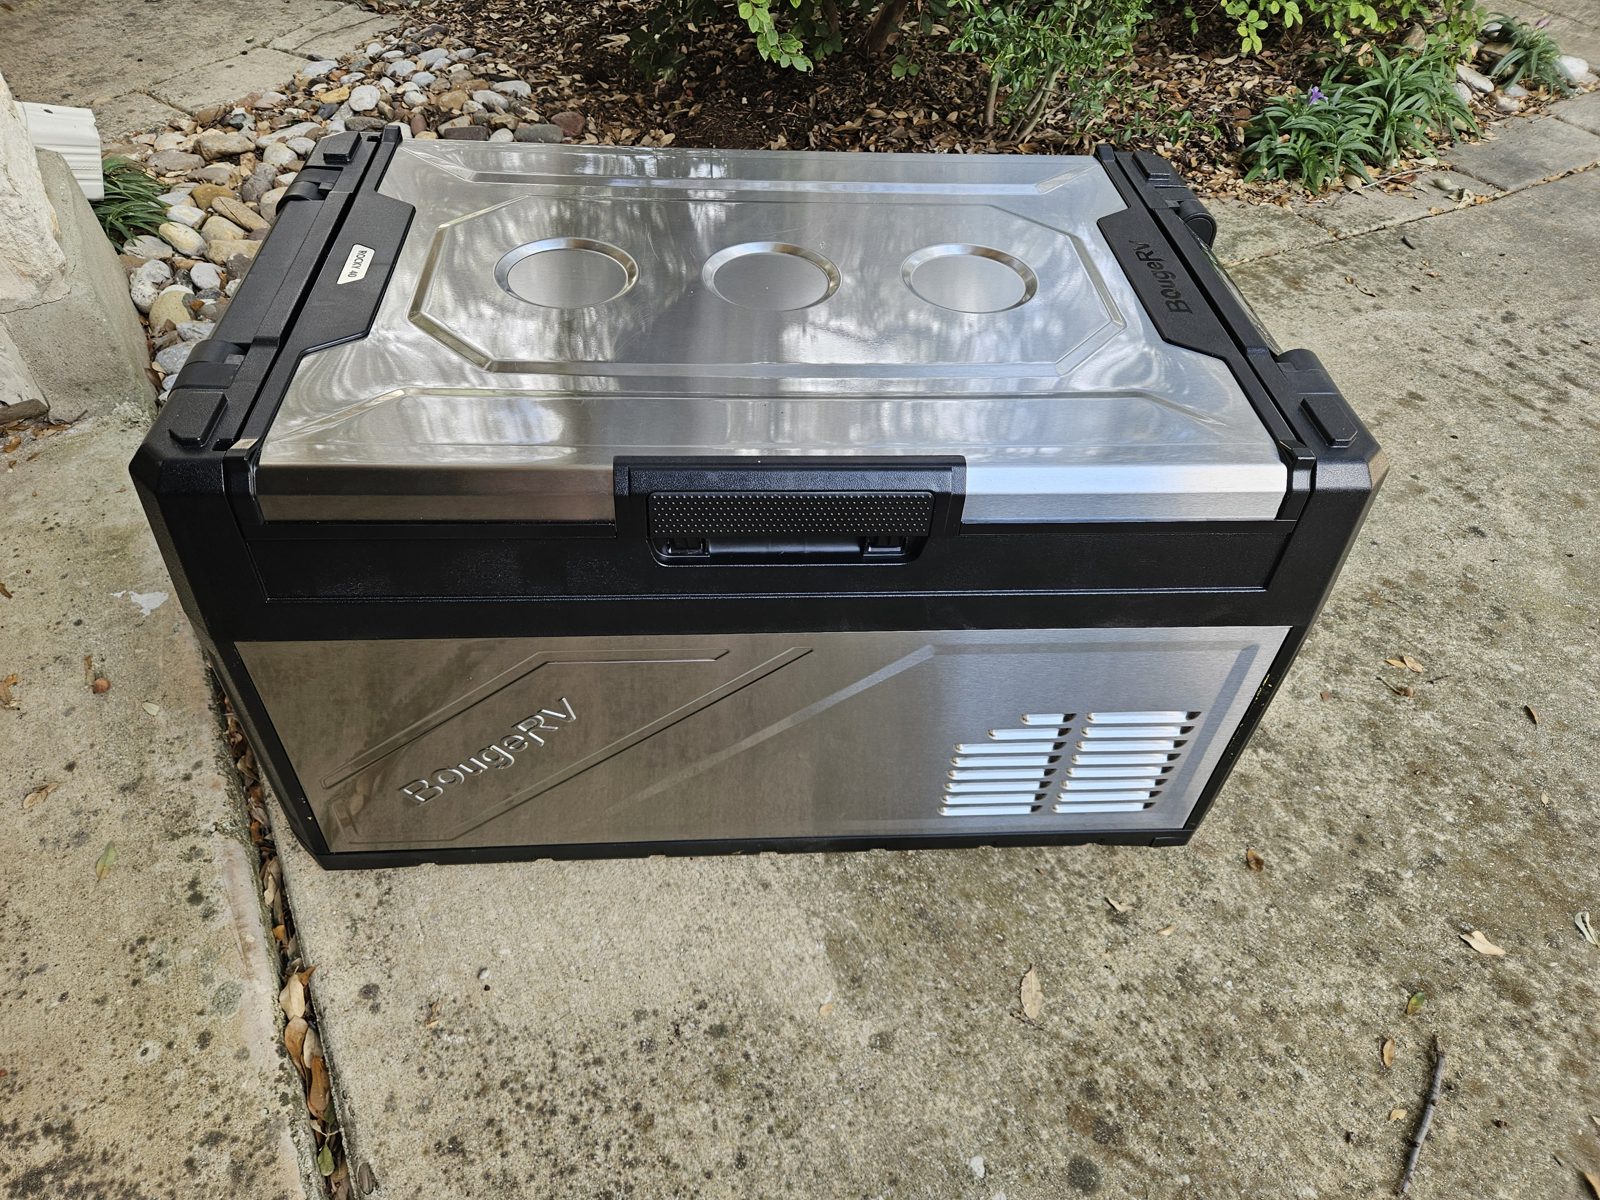
and the big-ticket gear that's bought and waiting on the panels that will carry it.
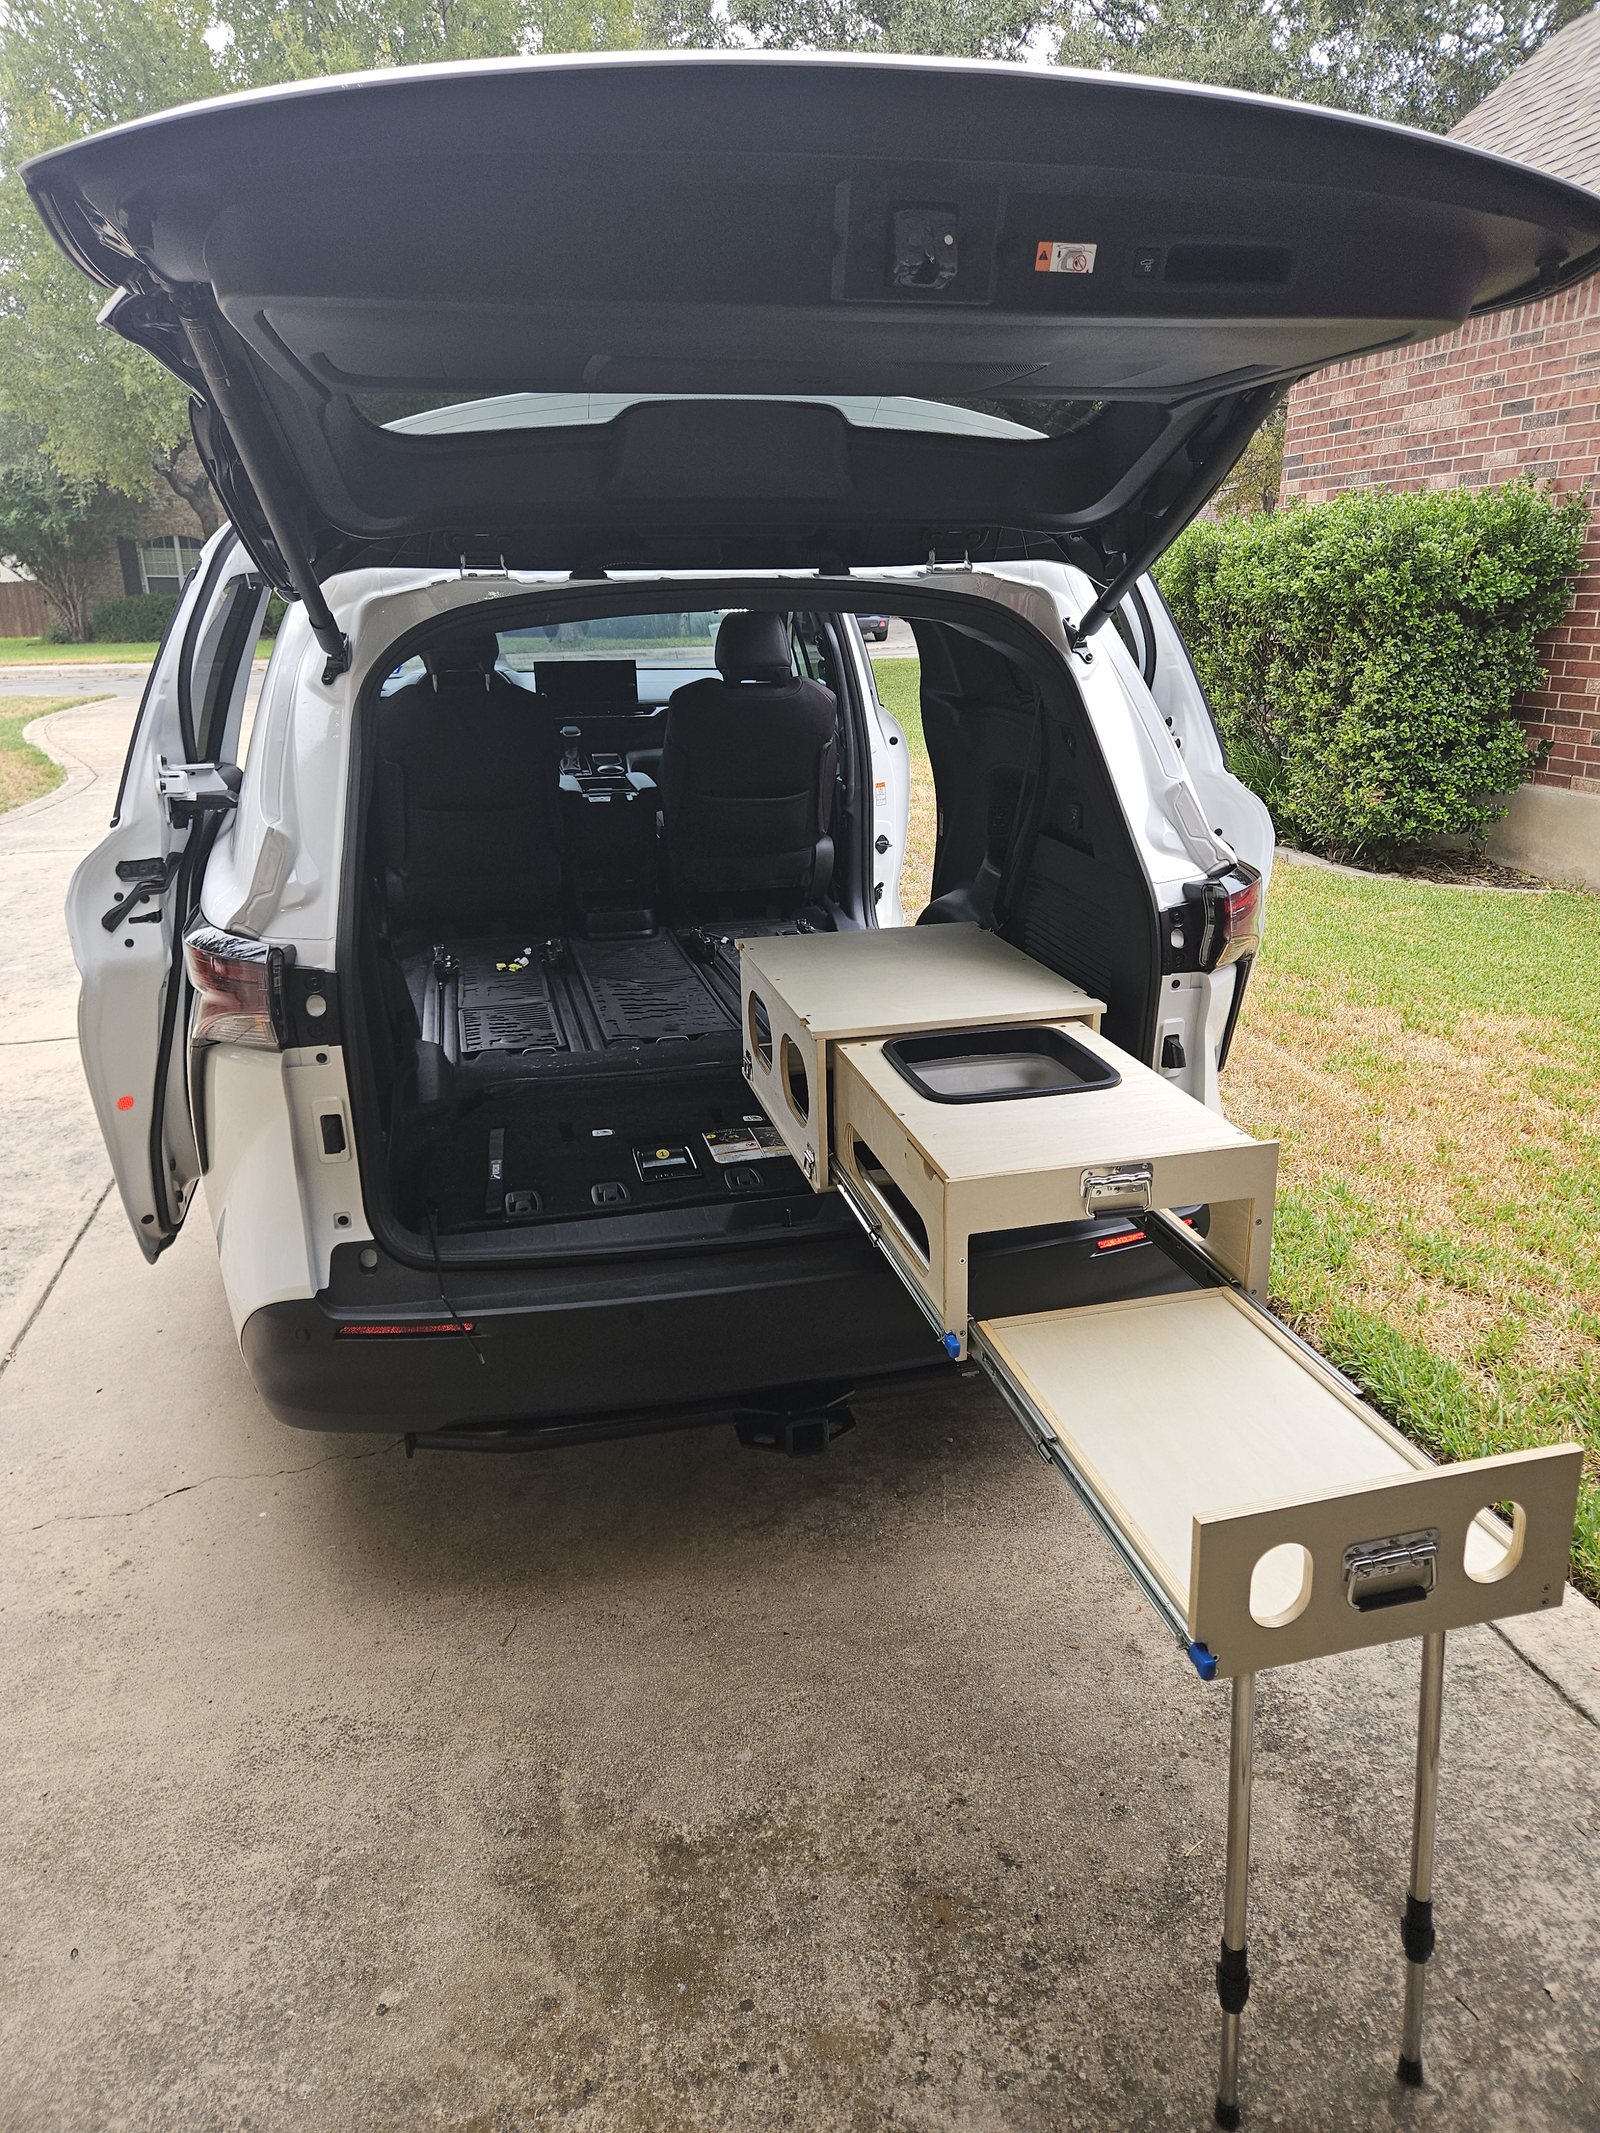
A fit check, not an install. The galley slid out of the open tailgate to see how it
sits against the empty second-row floor — nothing here is mounted, anchored or strapped down,
and the van hadn't moved. It's the first look at the shape the build is aiming at: everything works from
the tailgate, standing outside. The anchoring that has to exist before any of this travels is further
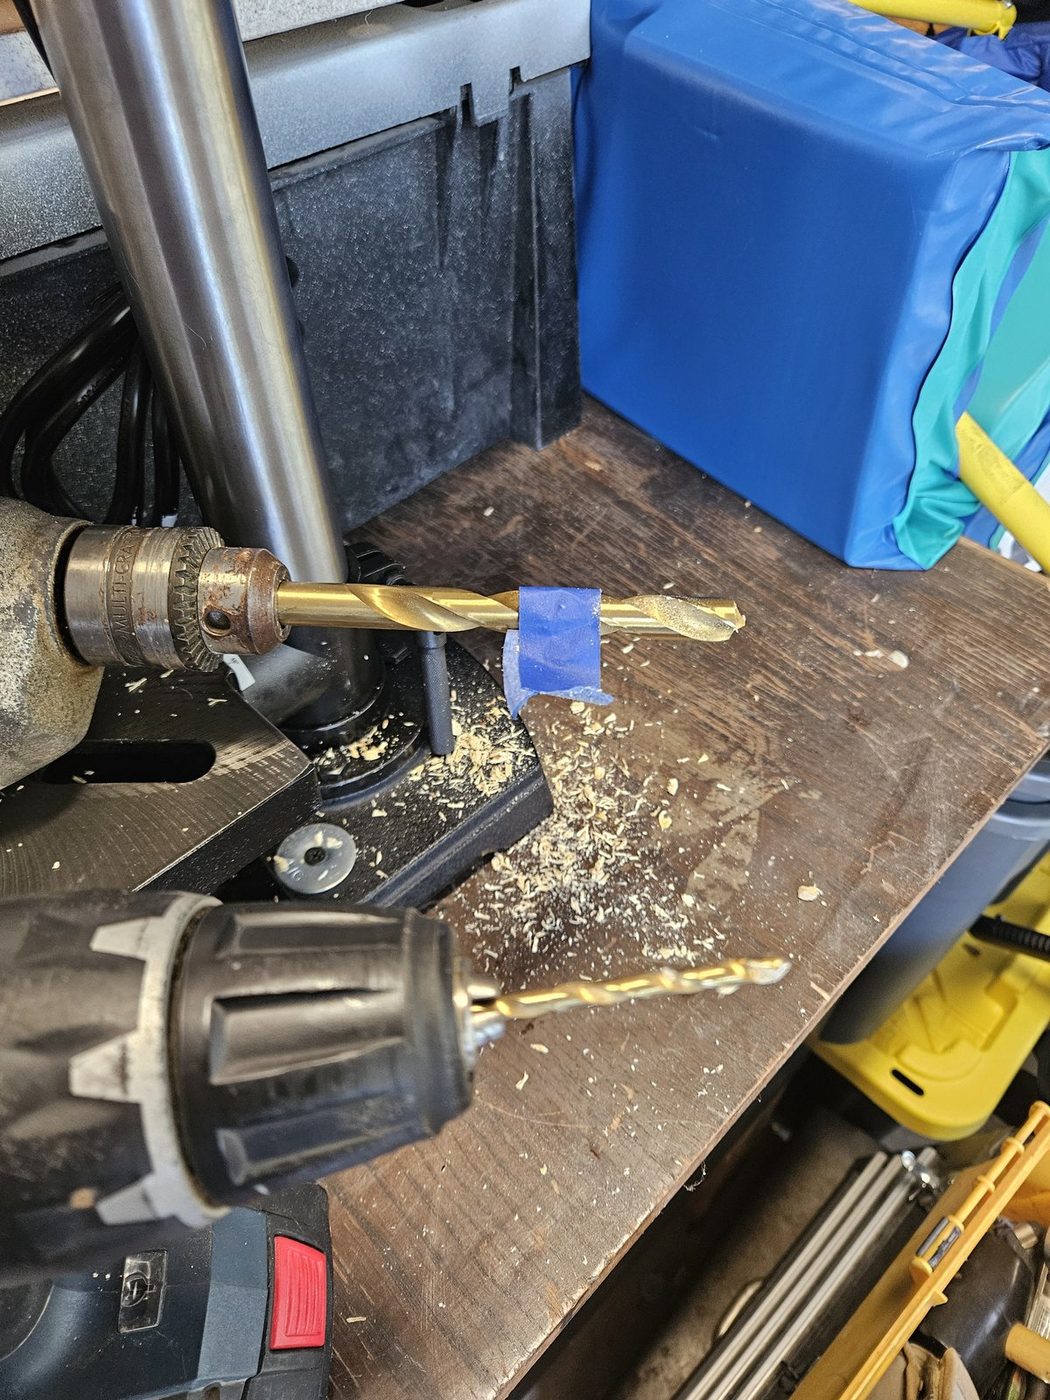
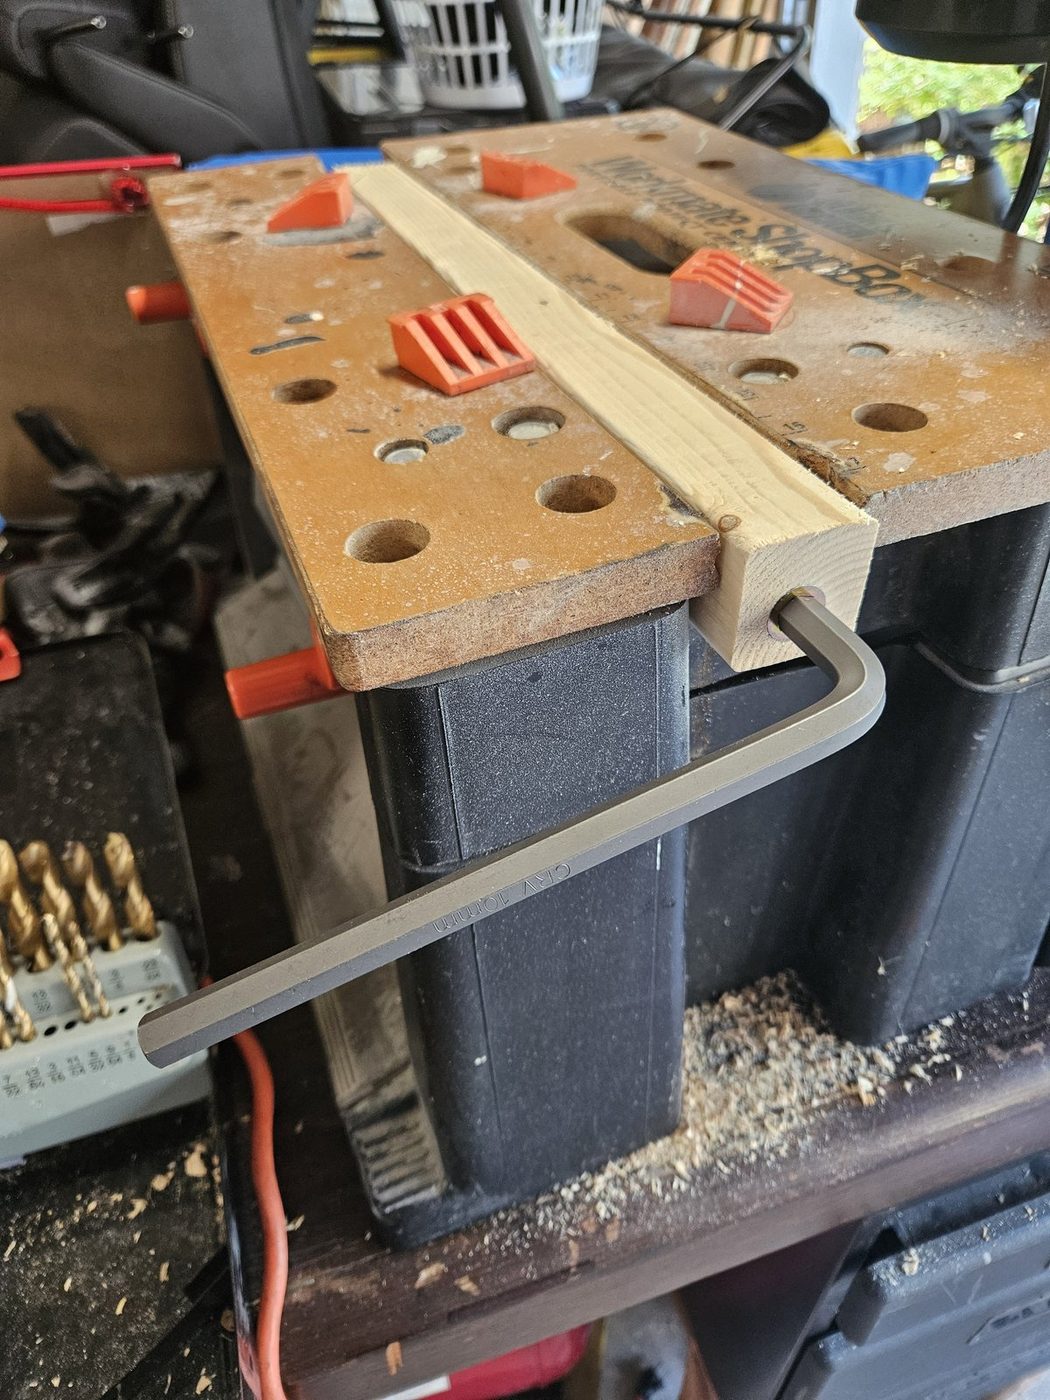
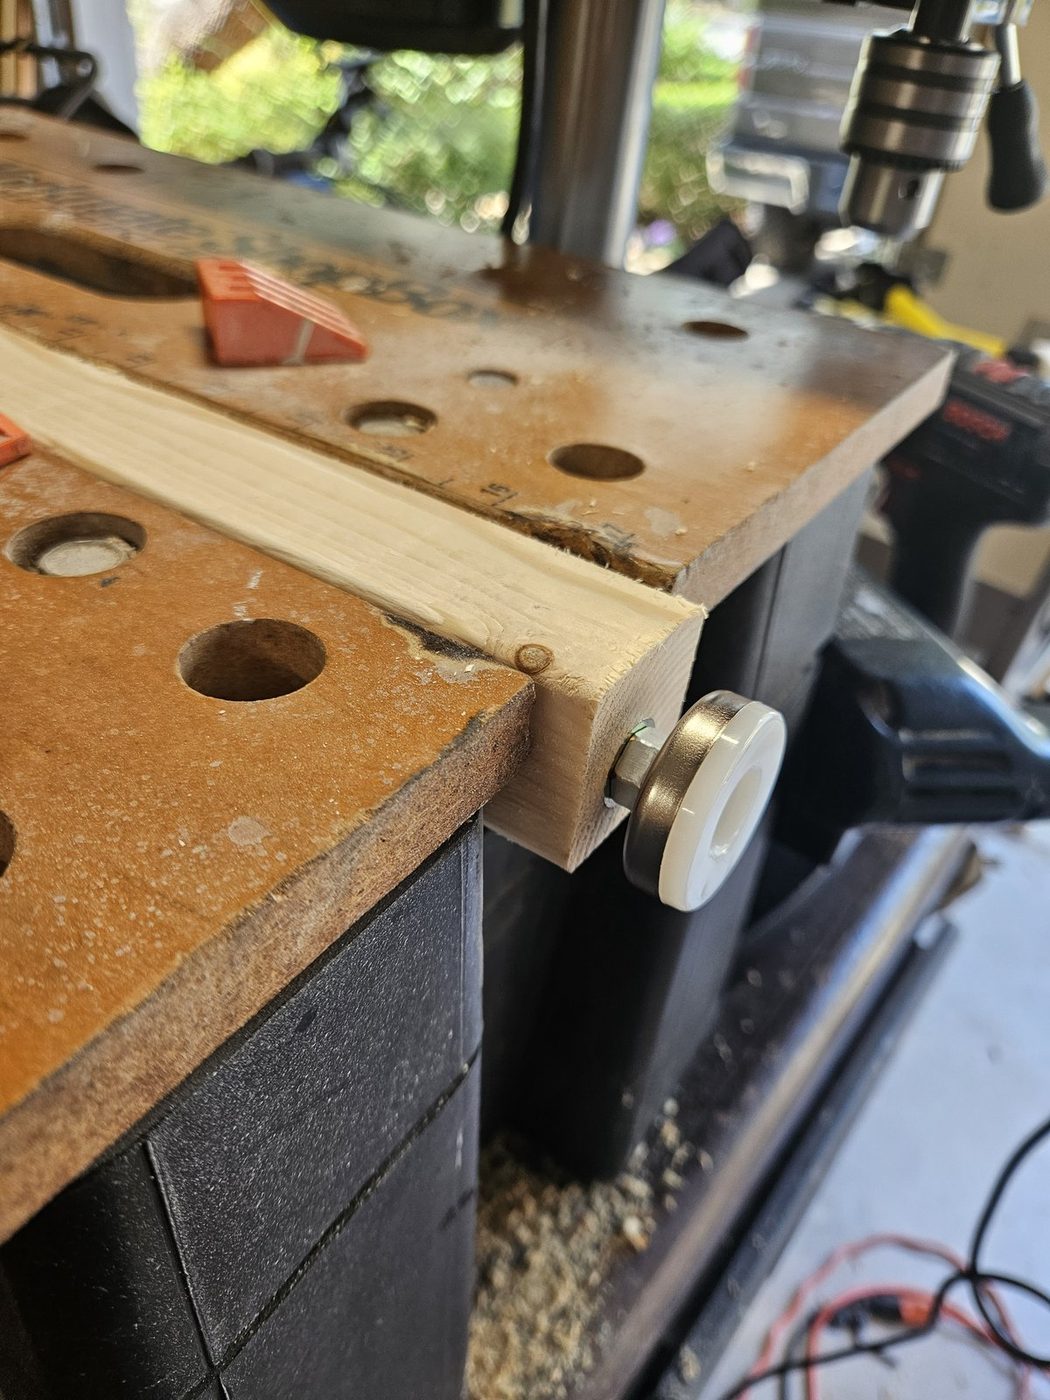
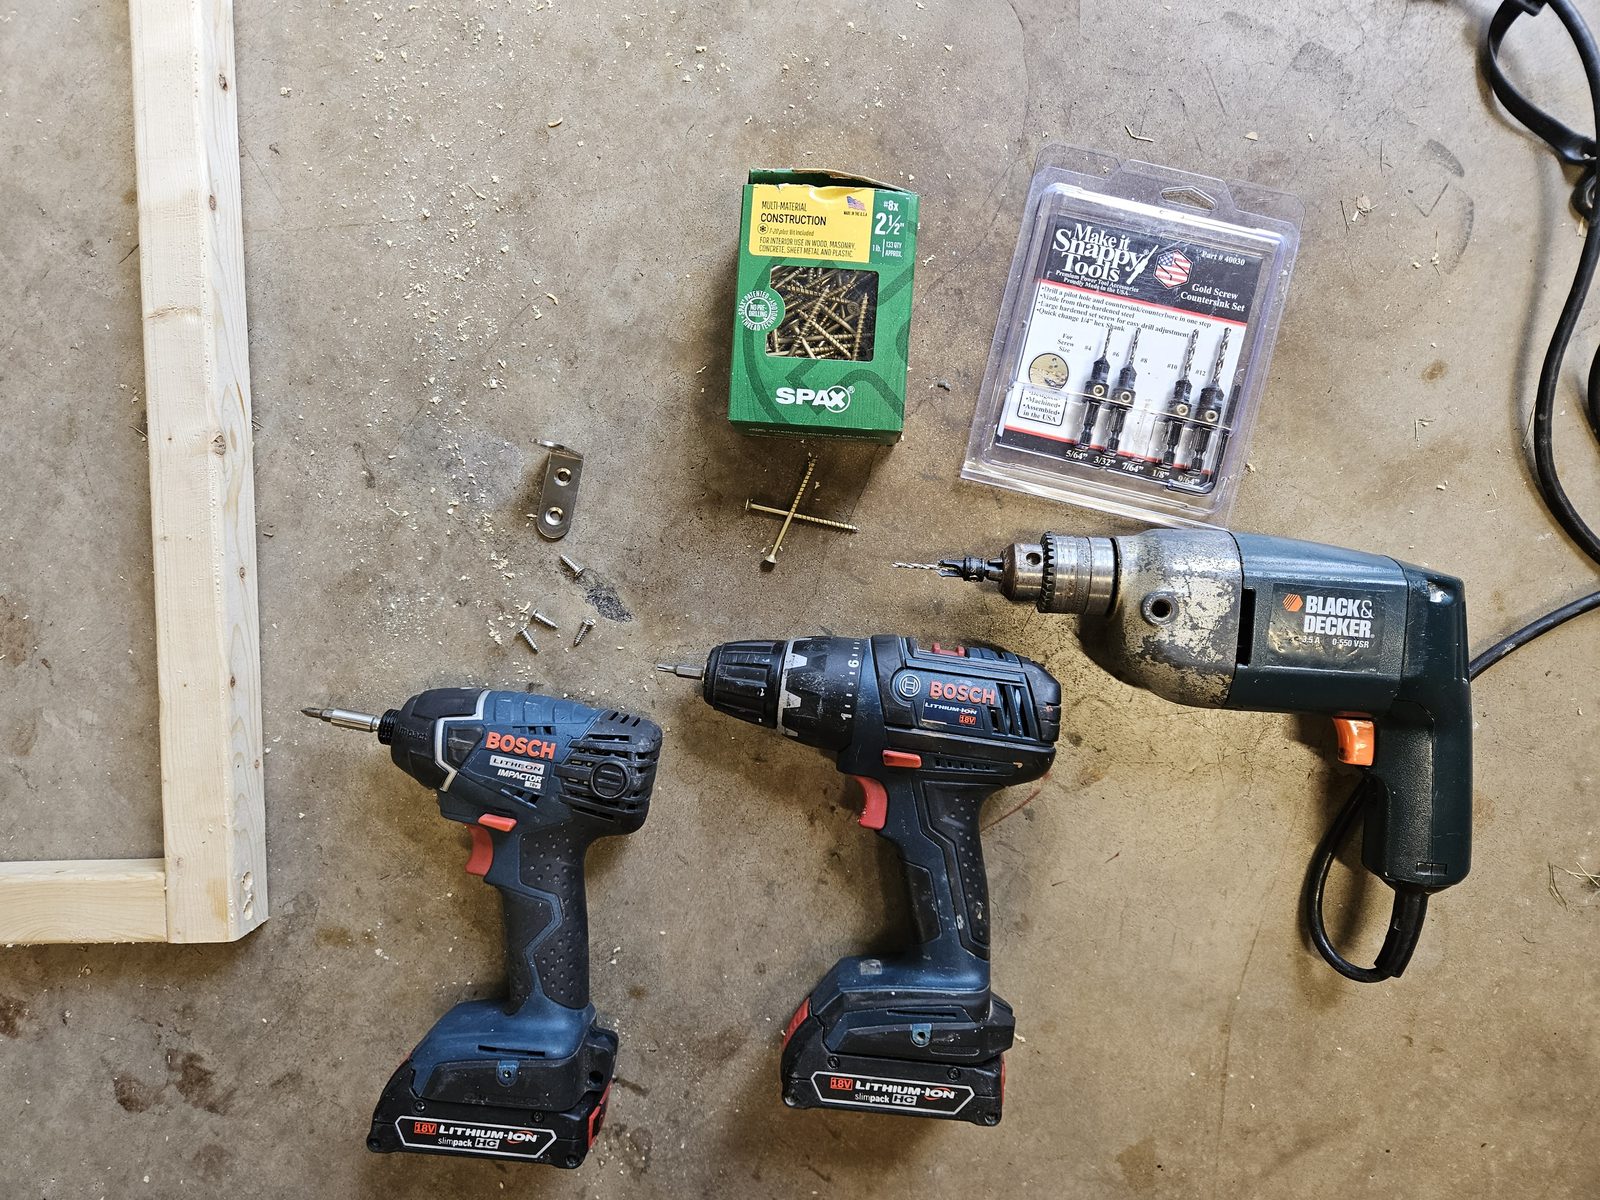
down the page.Two drills, so the pilot and the 1‑3/4" bore never swap bits. The tape flag on the bit is the depth stop — the whole leveling stud disappears inside the leg, so the bore depth is the dimension that matters.Driving the 3/8‑16 threaded insert into end grain with a 10 mm (1 cm) hex wrench — the insert's own hex drive. Not 3/8", not 7/16". A long-arm key gives the leverage to start it square.The foot threaded home: stud, fixed hex collar, 1‑3/8" pad. Almost no stud showing — which is exactly why the bore has to be 1‑3/4" deep.The feet, straight off the pack — 3/8‑16 adjustable levelers rated 330 lb each, sold with their own T‑nuts. Kept for the re-order code.Three drills, so no bit ever gets swapped. Every frame corner runs
pilot/countersink → Torx → Philips, four corners a panel — one drill would mean
twelve chuck changes. The corded one keeps the pilot/countersink bit and never runs flat; one
cordless takes the Torx for the SPAX screws, one takes the Philips for the corner brackets.
The drives really are different, which is the kind of thing you find out at the bench
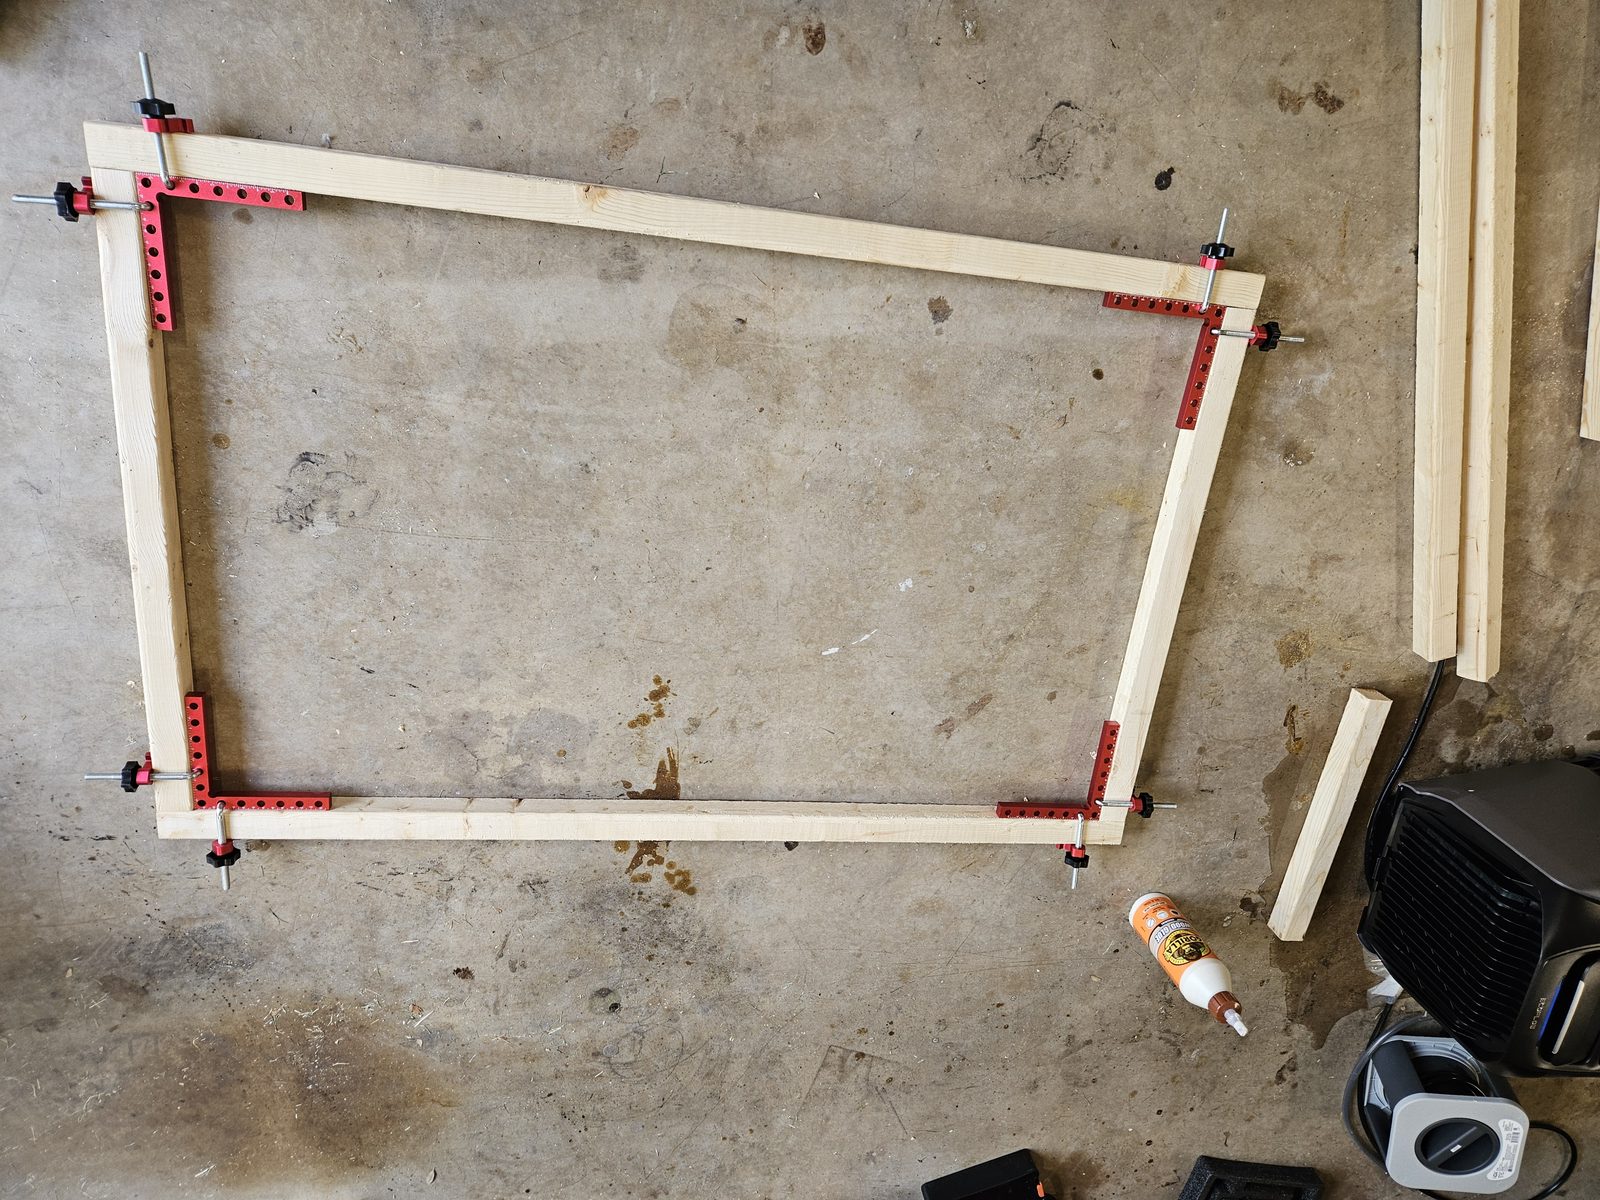
and not at the store.Glue the whole frame up flat and square before a single screw goes in. Four
right-angle clamps hold each corner at 90° while the glue grabs, so the frame sets to
its shape instead of to whatever the first screw pulls it into. Check the diagonals while
it's still adjustable — a square 46″ × 29″ frame is what lets
the panel seams close flat later. There's no bench under it on purpose: the garage floor is the
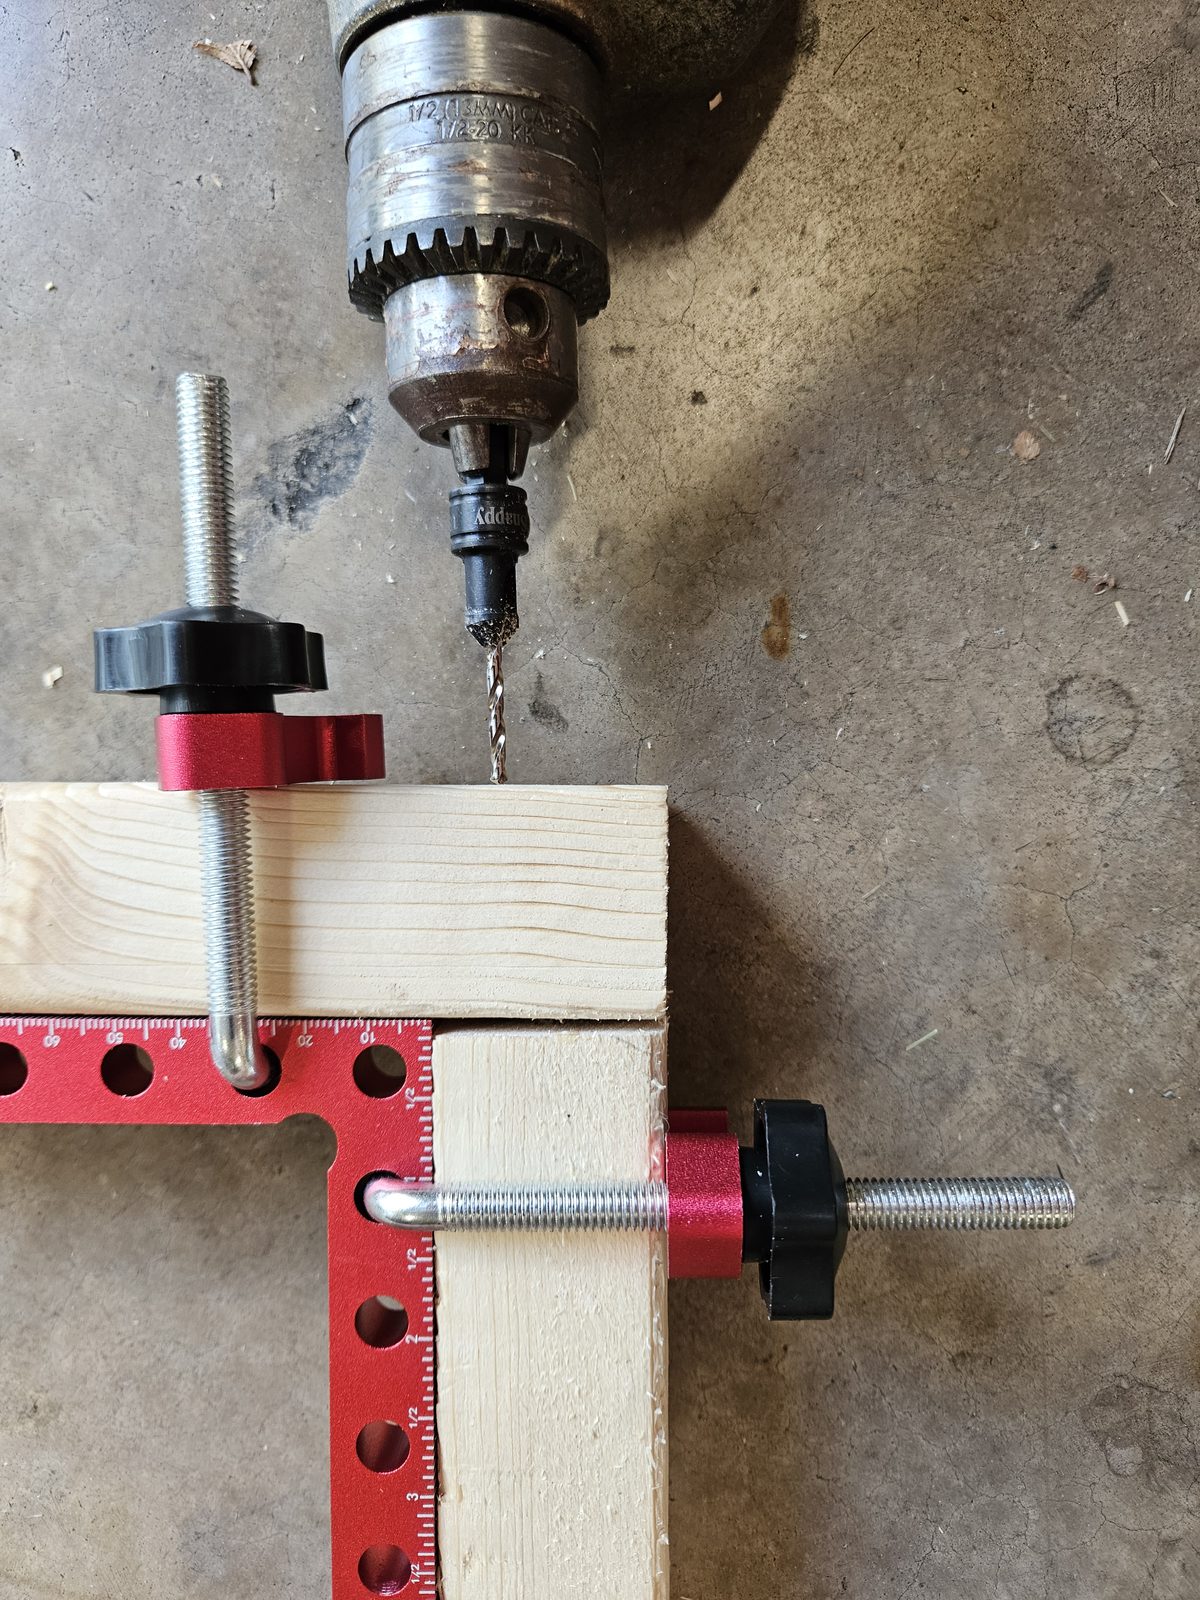
flattest reference surface in most shops.Pilot and countersink in one pass, drilled with the corner still clamped.
2×2 pine this close to an end will split if you drive a 2½″ screw into it dry.
The countersink half earns its keep too: the head has to pull below flush, because a steel
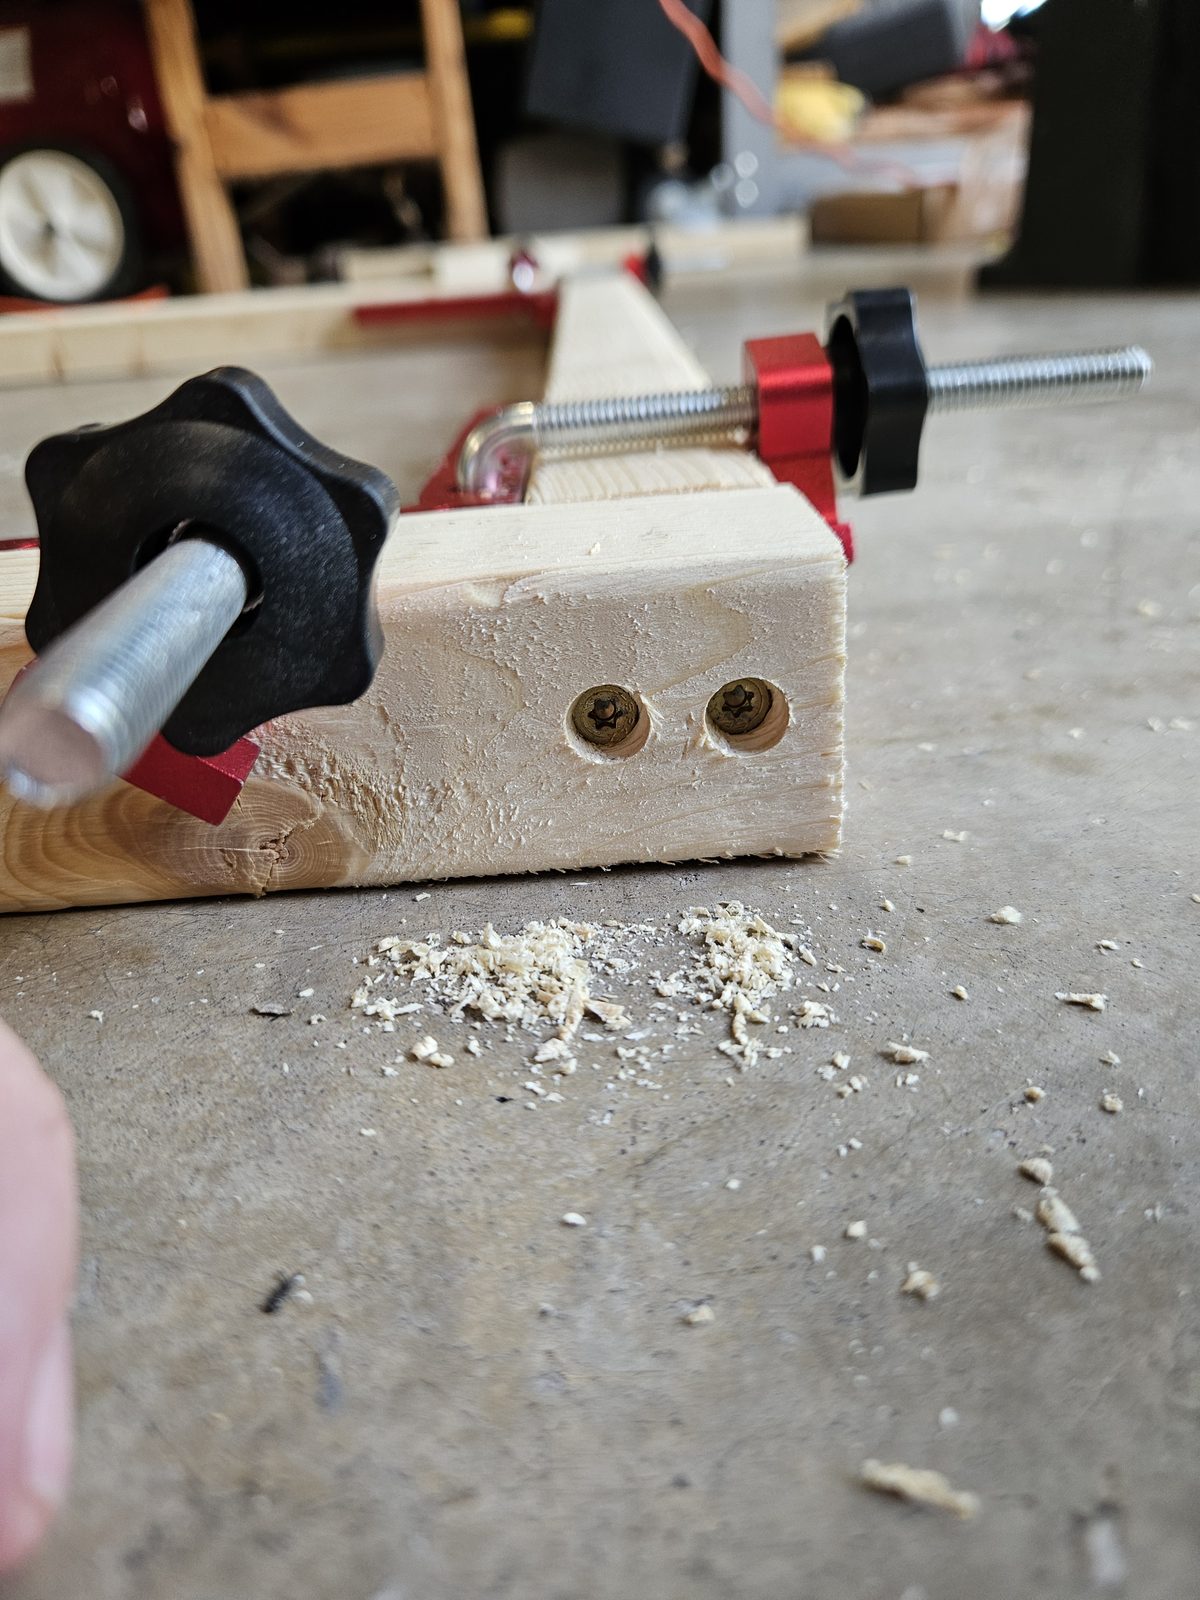
bracket sits flat on that same face afterwards and would rock on a proud screw.Two screws a corner — and they're 2½″, not 2″. Driven
through the outboard end rail's face into the end of the side rail behind it, both below flush.
The length got corrected during this build: through a measured 1‑7/16″ of end rail, a
2″ screw keeps only about ½″ of bite — not a joint to trust on a module
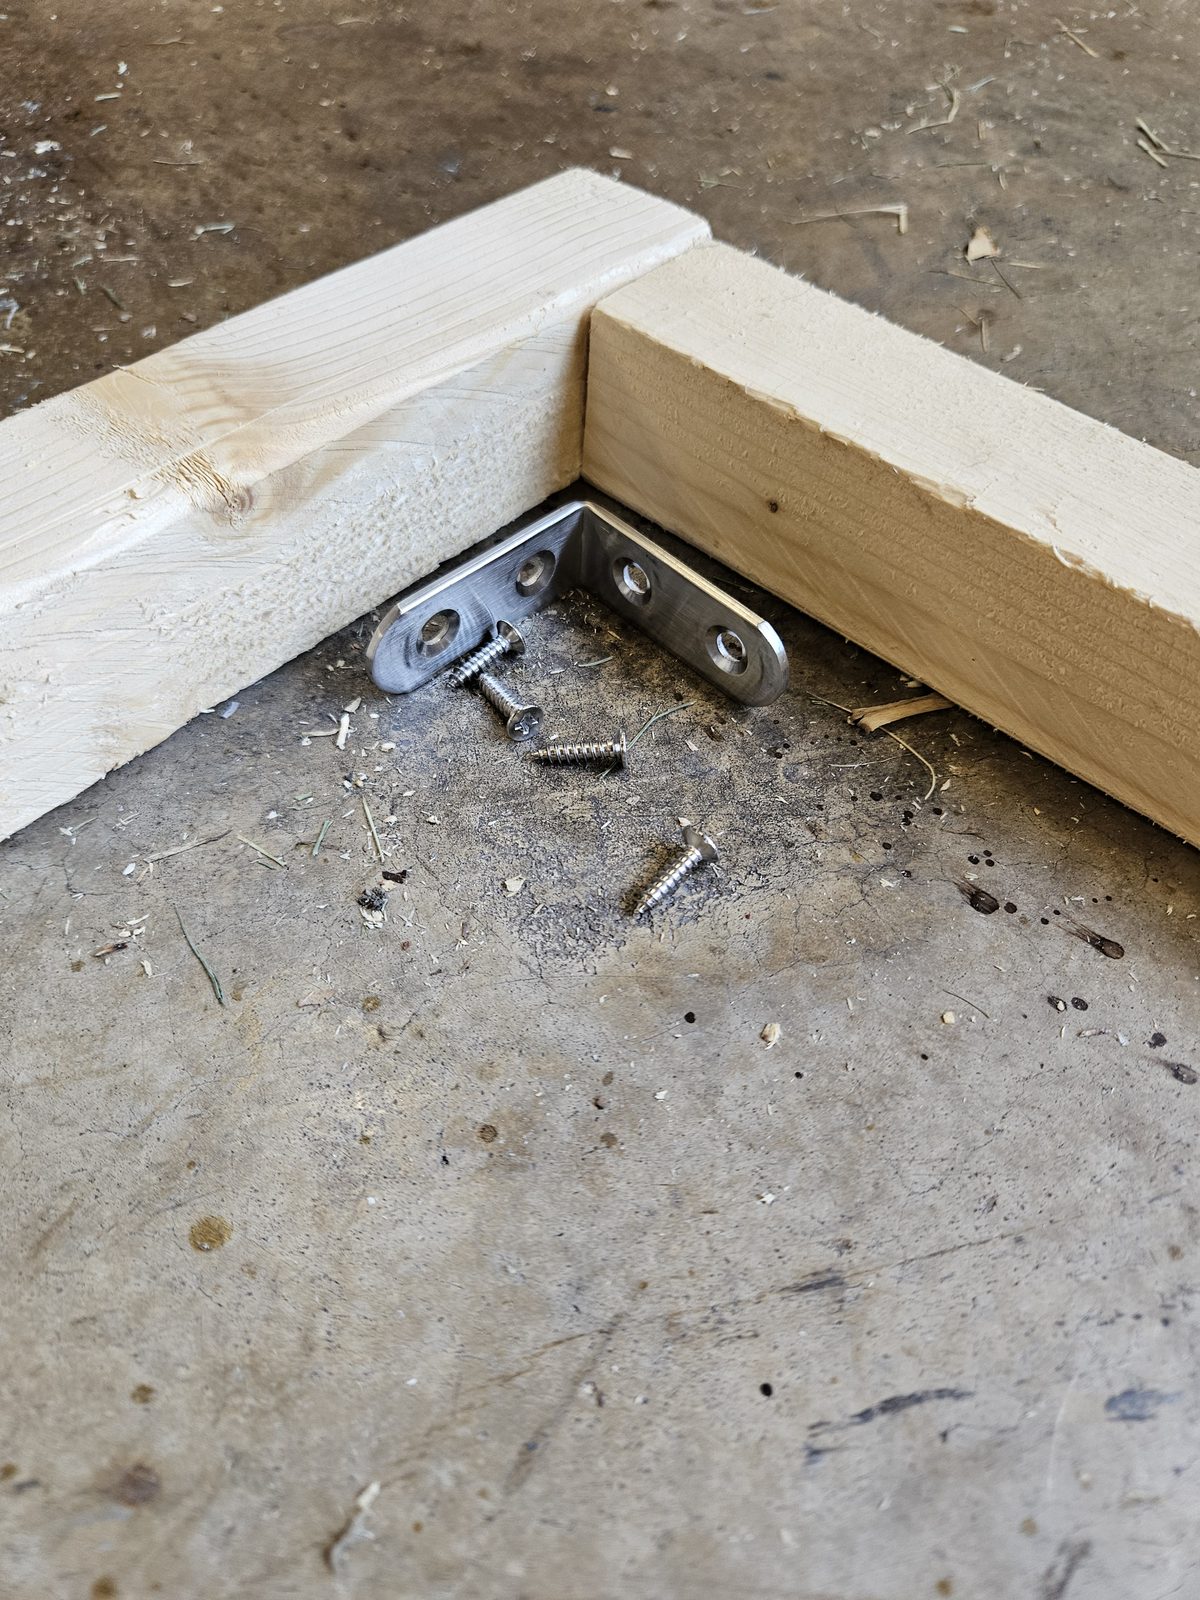
that gets lifted in and out of a van by its rails.The bracket goes on after the screws, not instead of them. Four a panel,
flat steel, inside the corner. The glued and screwed joint carries the load; the bracket's only
job is holding the angle, so the corner doesn't work loose over a few hundred miles of road
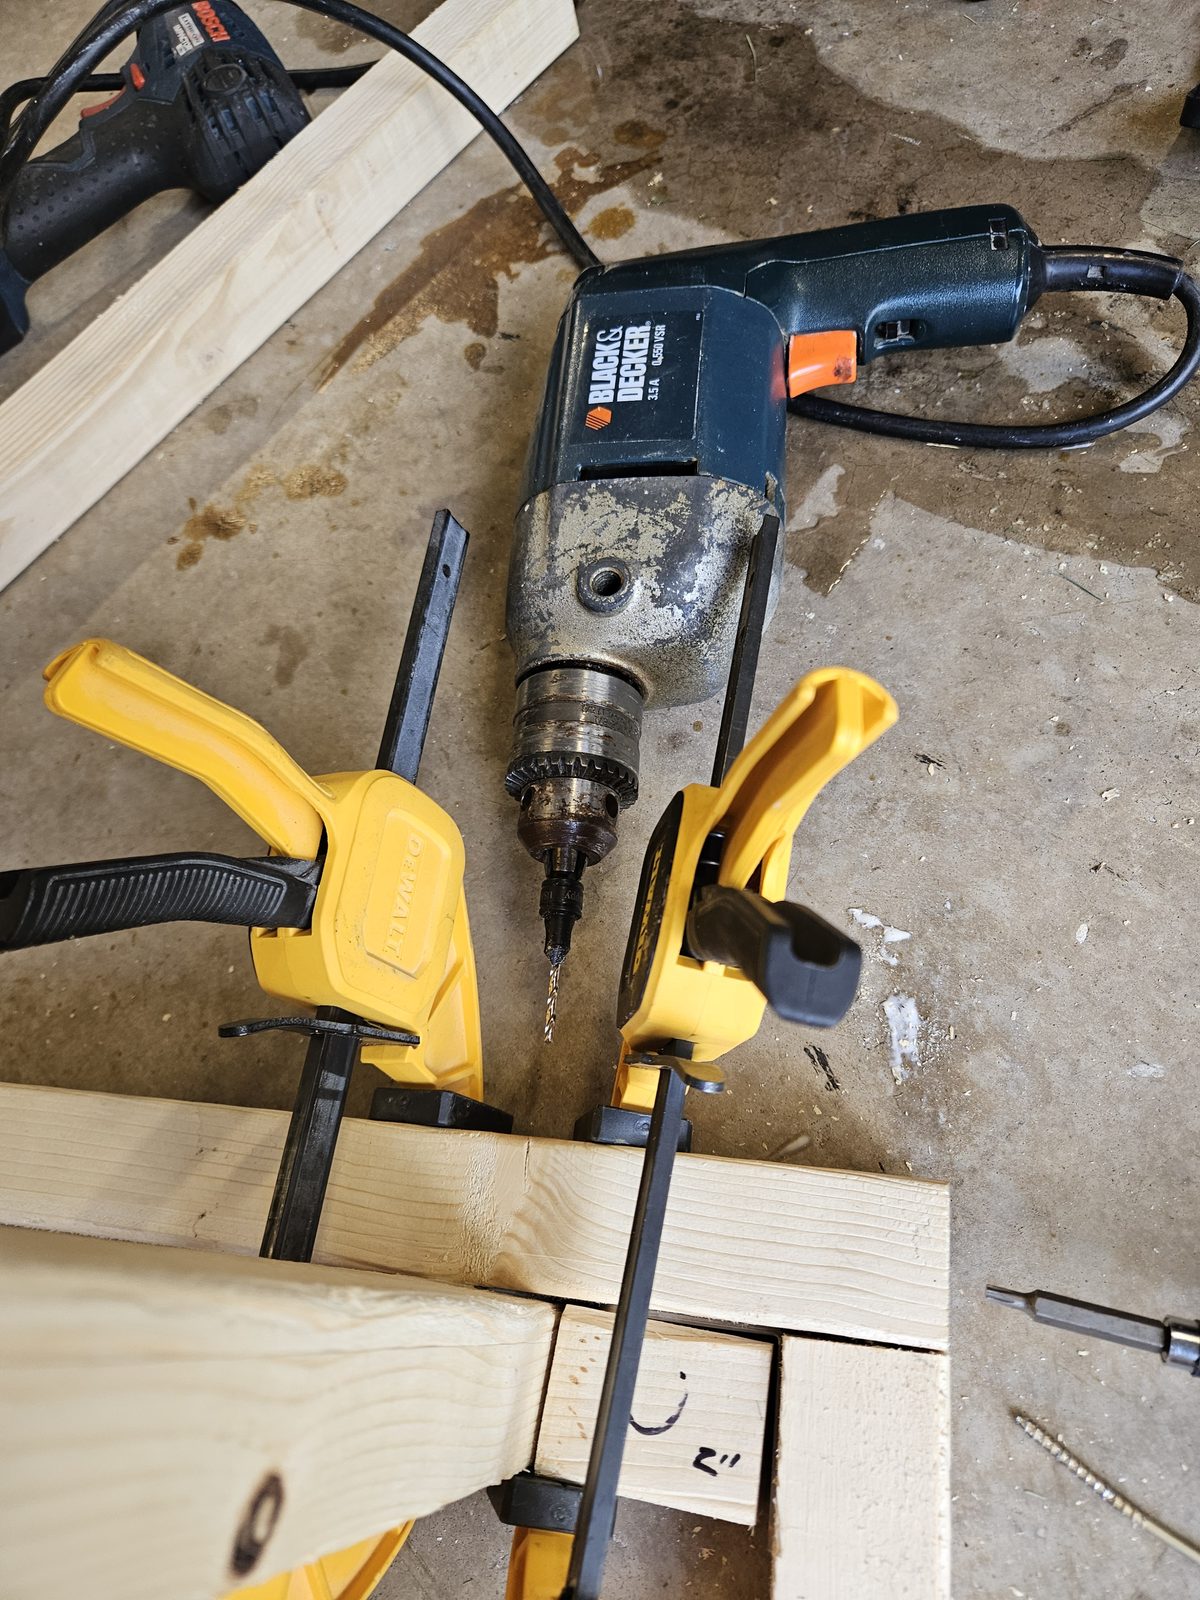
input.Cheapest jig in the build: one offcut, cut once. The leg has to sit flush
with the rail top and stay there while the pilot and both screws go through — unclamped it
walks under the bit and ends up proud of the rail, which is the one surface the bed platform
lands on. Two bar clamps hold it, and the marked block sets the leg's position across the
panel. The 2″ is the gap between the side rail and the leg, not the leg's inset from
the edge — rail flush with the deck edge at a measured 1‑7/16″, plus the
block, puts the leg 3‑7/16″ in, which is where the floor vents say it has to be.
It's a gauge, not a shim: register the leg against it at every corner and the position
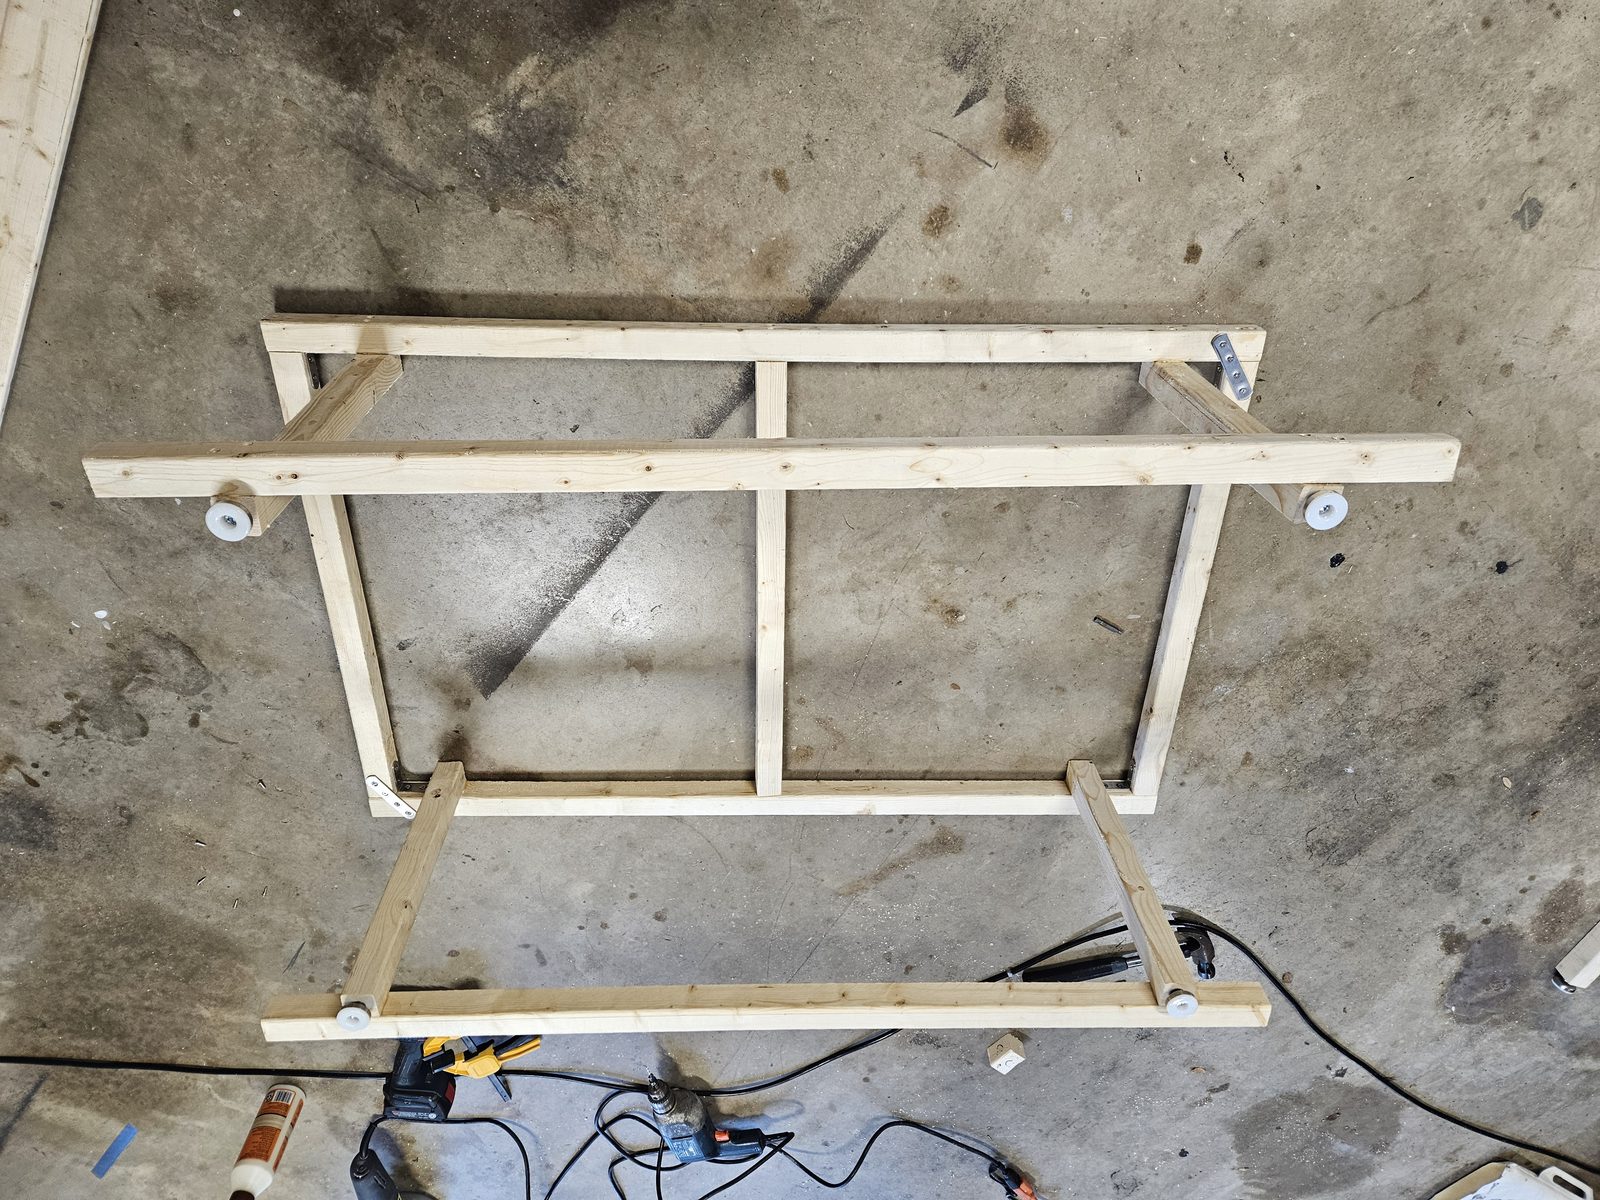
never gets measured twice.Panel A's frame, done — shown upside down, which is how you work on it.
The four white leveling feet are already threaded into the legs' end grain, the centre divider
is in (it splits the bay into the DELTA 3 drawer run and the WAVE 3 bay), and the
bottom rails close the frame. The steel straps at two opposite corners are the spec, not two
that got skipped — it's 2 diagonal braces a panel, and Panel A gets the rest of
its racking stiffness back from its bed section, which screws down and acts as a diaphragm
across the rails. Still to come on this module: that bed section, the drawer slide and the
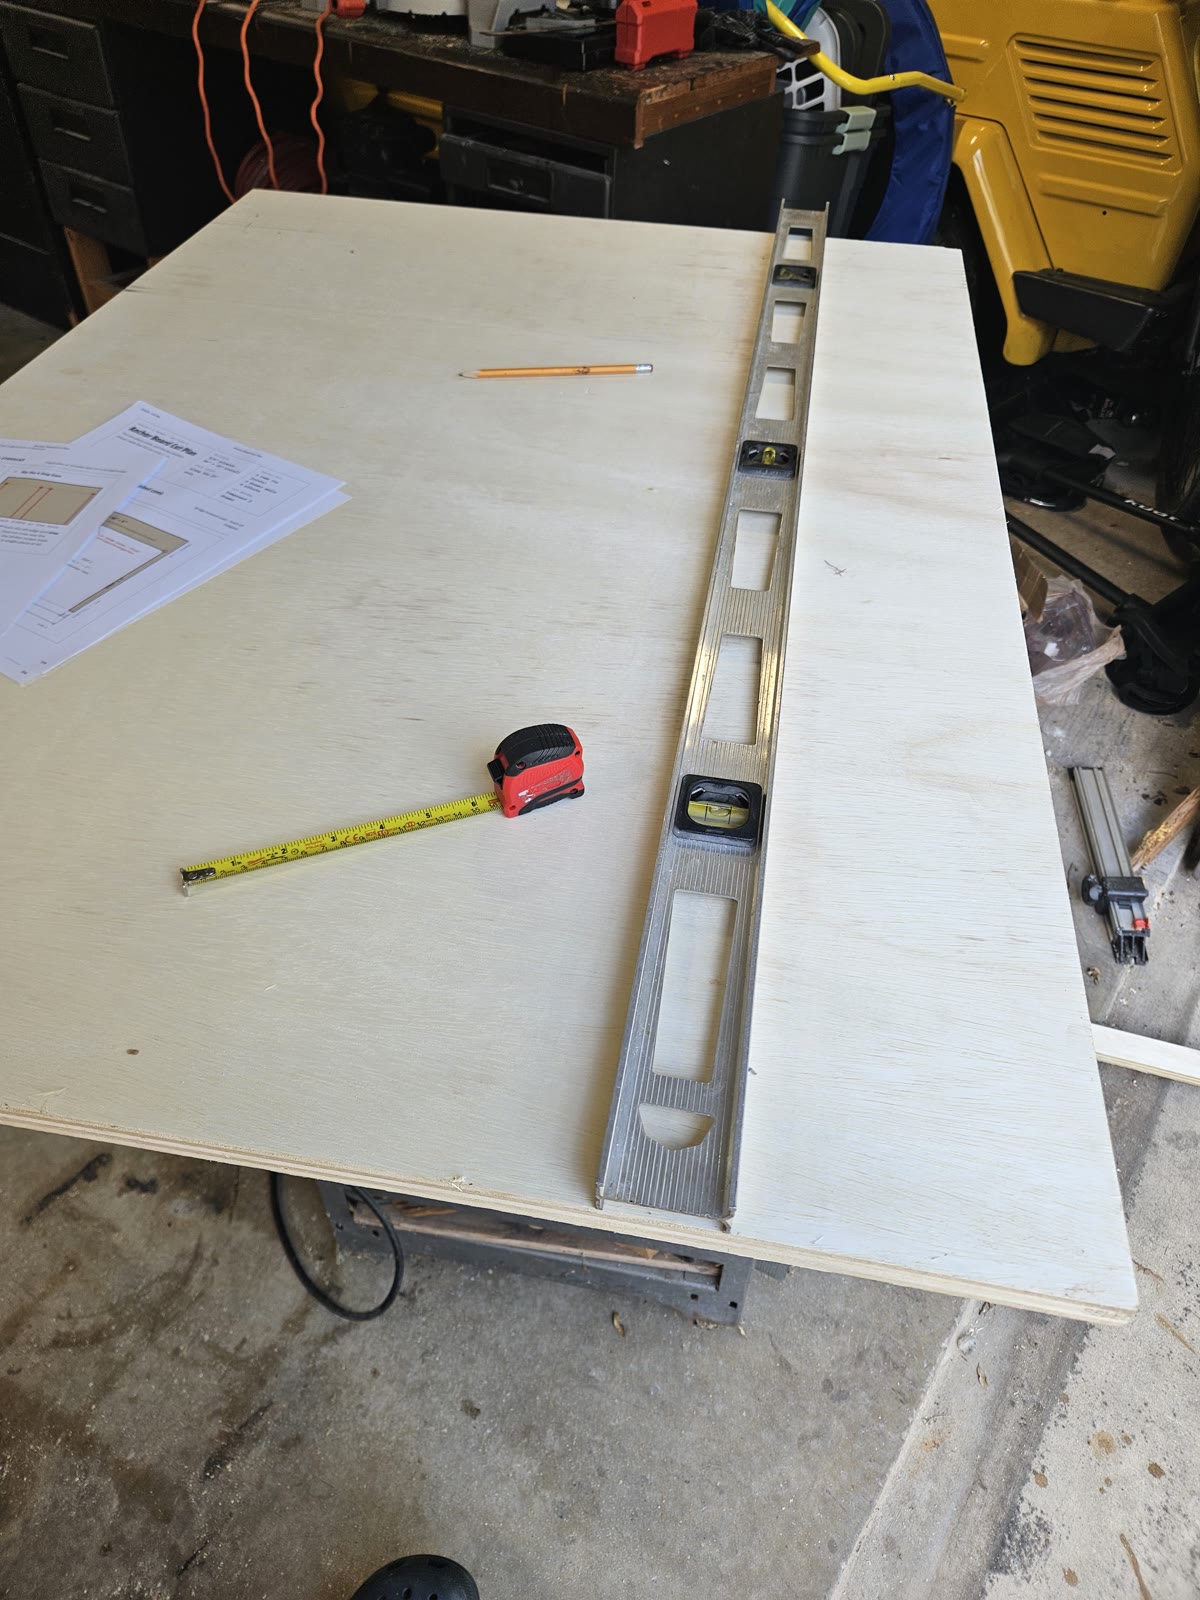
WAVE 3 vent kit.The cut plan, printed and sitting on the wood. Not read off a phone, and not
held in memory — there are near-identical rectangles in this build that differ by an inch.
The straightedge is a 4 ft level, the longest true edge most shops own. This is also
where face grain gets confirmed: the anchor board's runs a specified direction, and that is
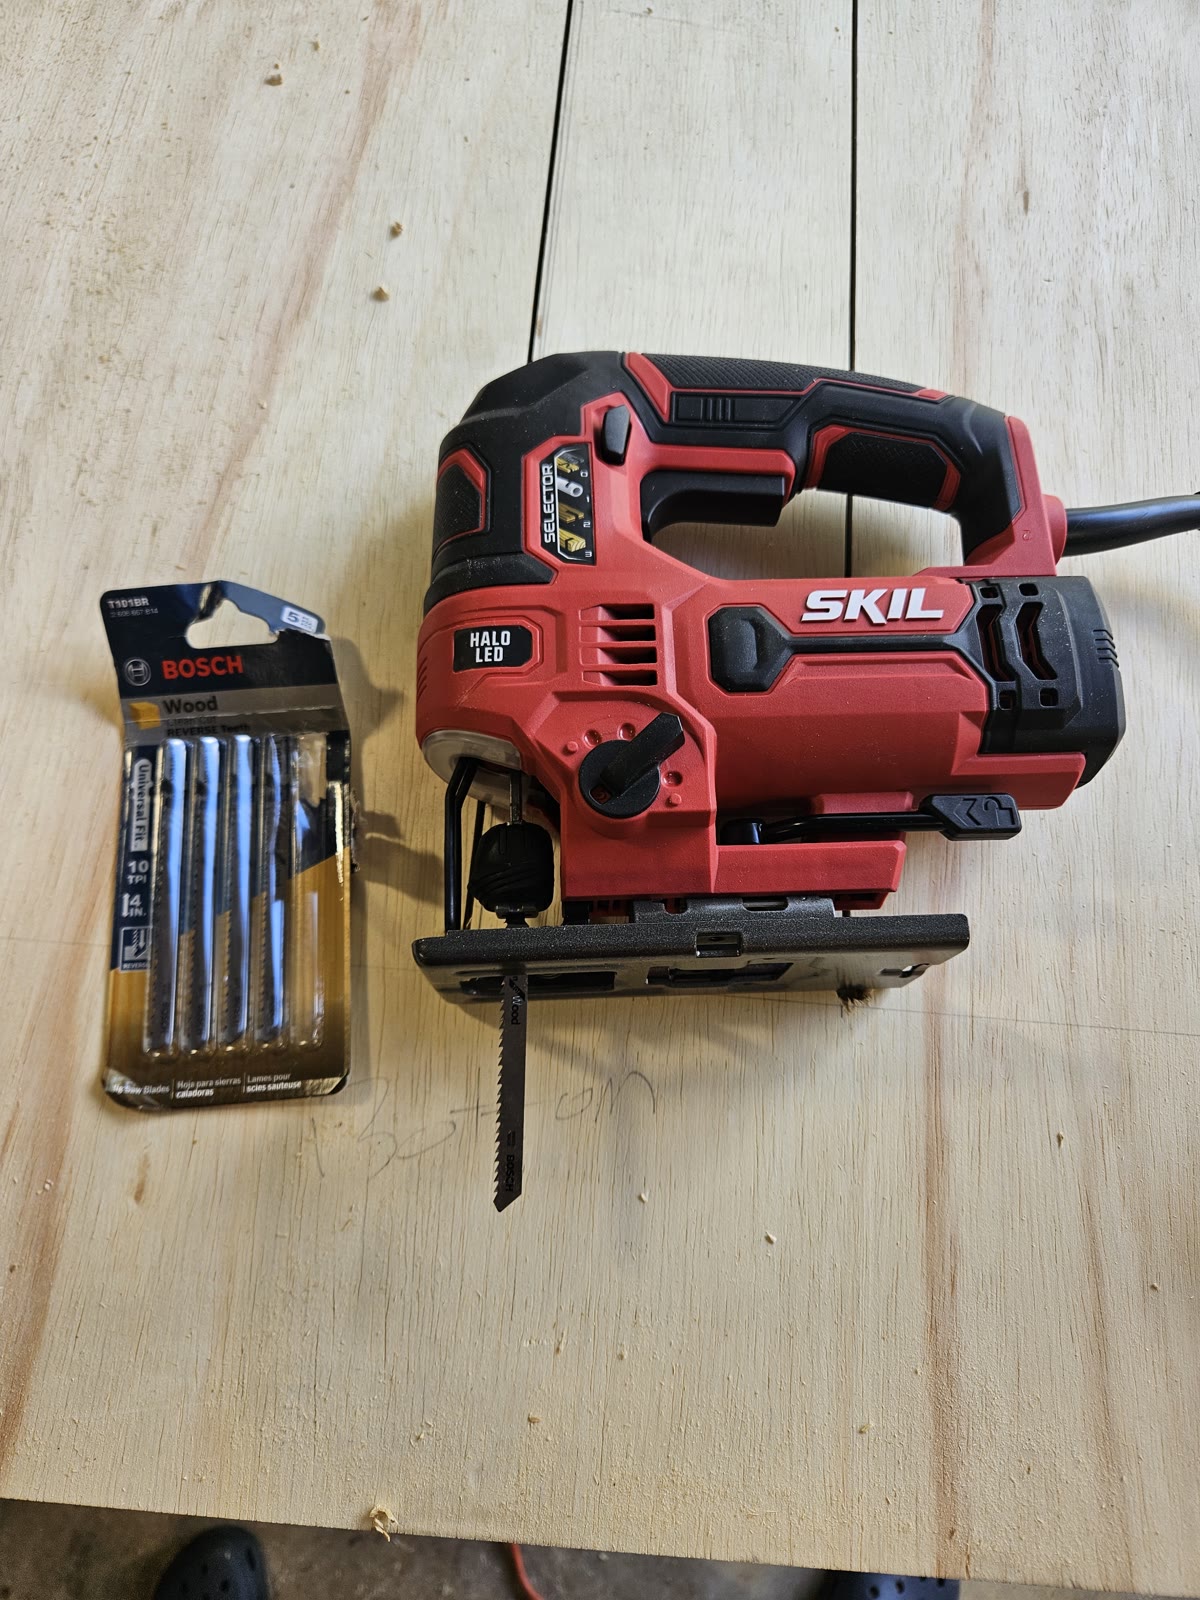
unrecoverable once the piece is cut.The detail worth stealing: a reverse-tooth jigsaw blade. That's Bosch
T101BR — the R is for reverse, so the teeth point down. An ordinary
jigsaw blade cuts on the upstroke and splinters the top face, which is the face you
marked and the face you'll see. A reverse blade moves the tearout underneath. It also
pushes the saw up off the work, so hold the shoe down and feed slower. Then set the
orbital selector to suit the stock — on 3/4" ply the low settings are what
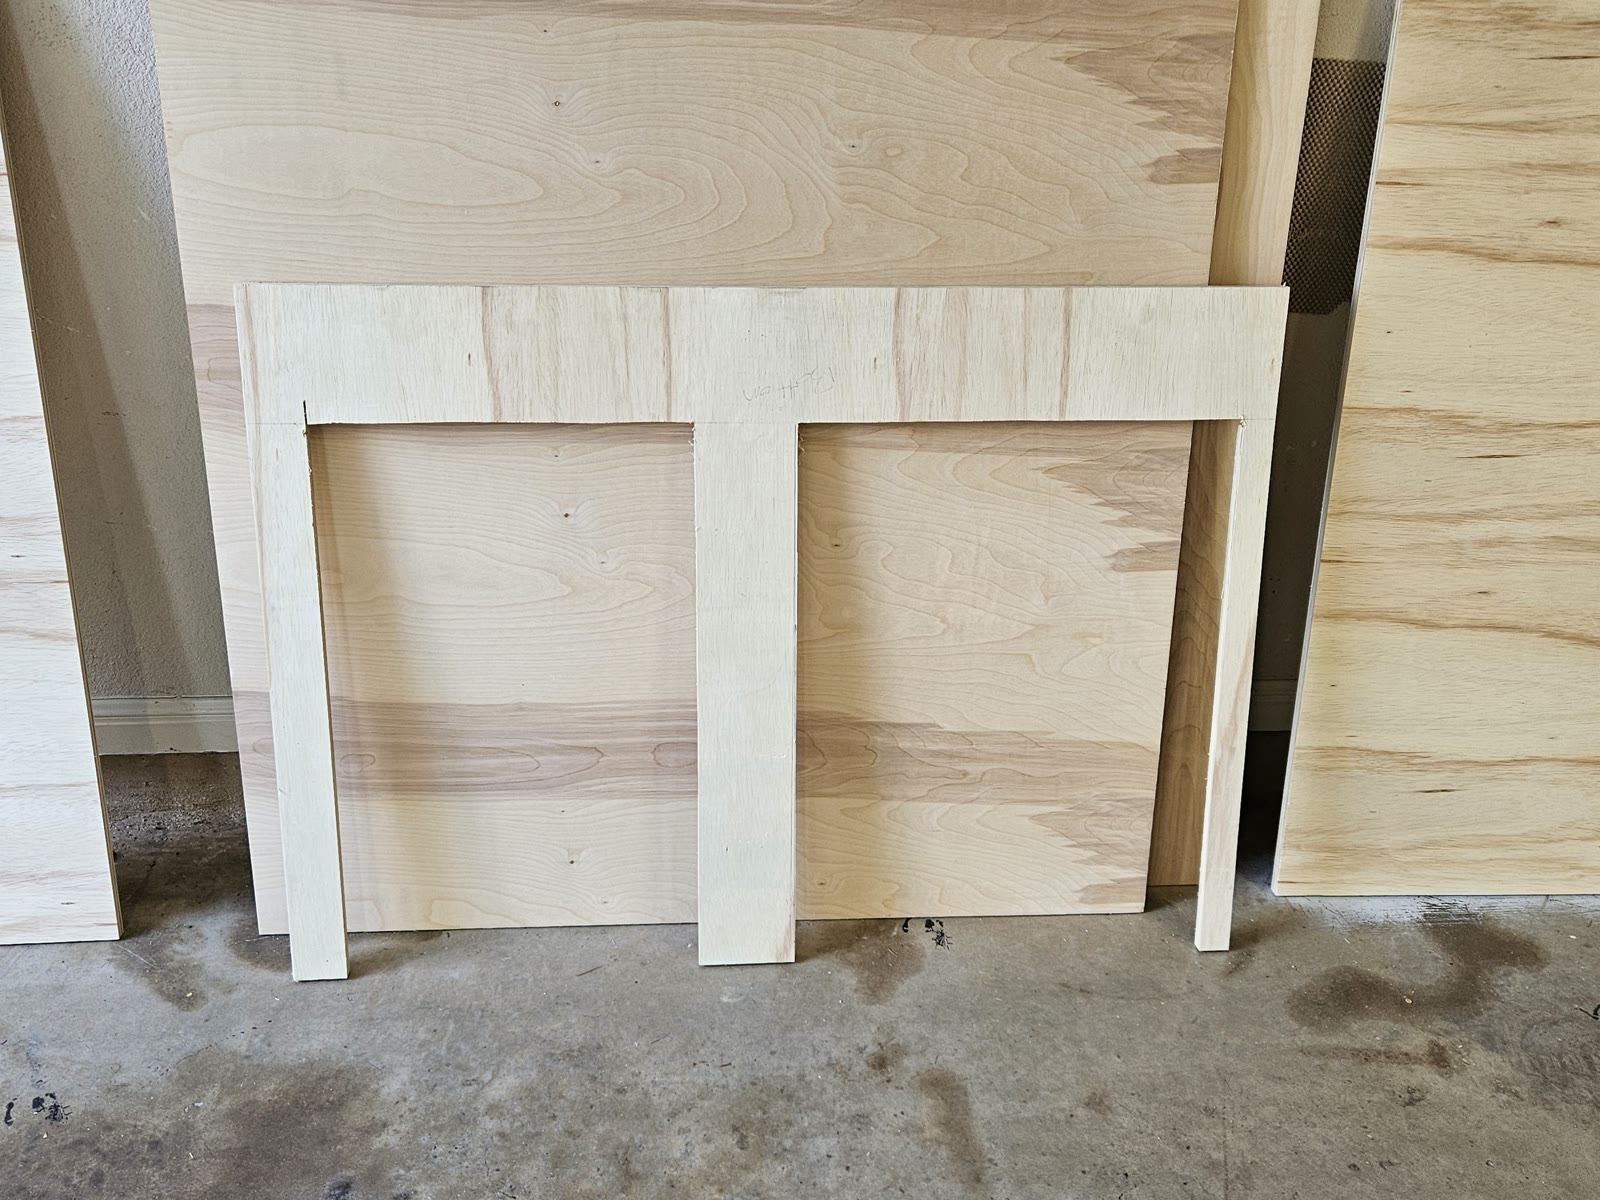
keep the edge clean. Most people never touch that dial.The anchor board, cut as one piece. This is the part the whole no-drill
restraint plan rests on — a single plywood comb, bridge and all three strips continuous,
with no glue and no ply-to-ply joint anywhere in it. Every interior corner was drilled
before it was sawn: a bit dropped on the corner, then the jigsaw fed into the hole to finish
the cut across. That drilled hole does two jobs at once — it's the radius that stops a
square corner tearing under load, and it's the only way to get a blade into the corner at
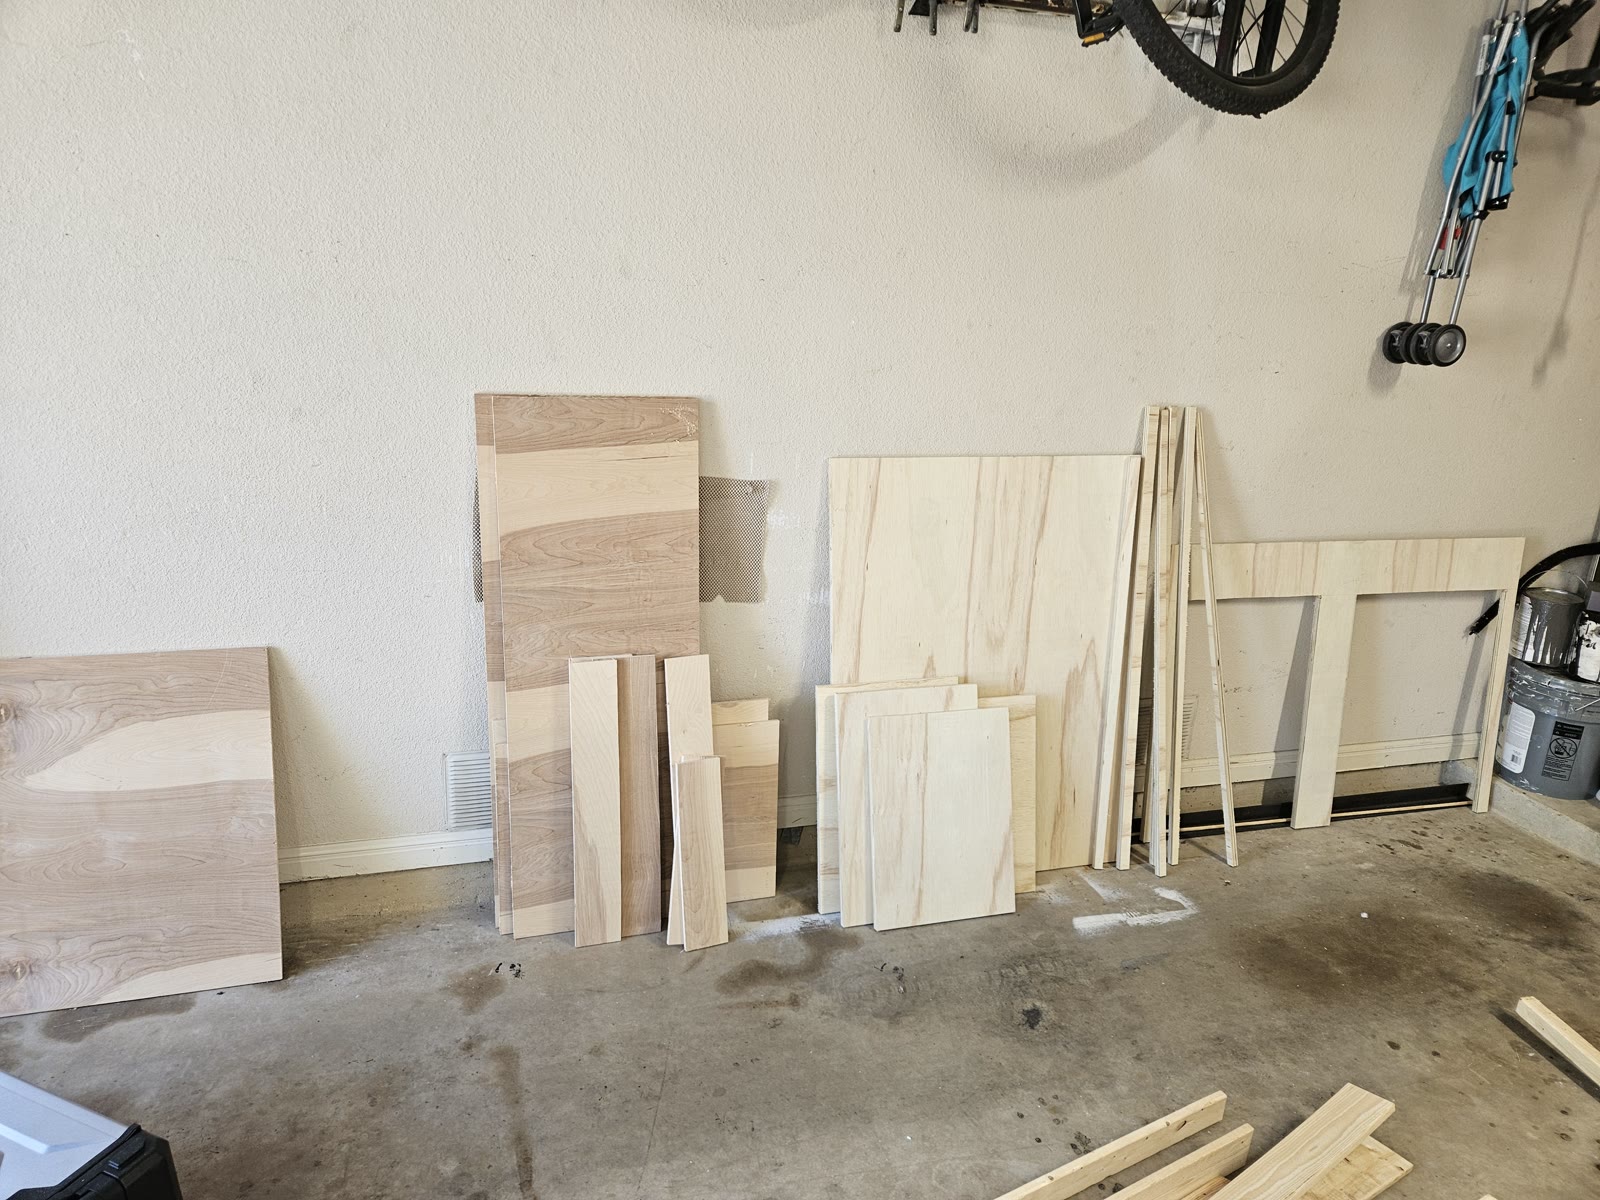
all. The two gaps that fall out aren't scrap either; they're the battery drawer's walls.Two sheets of plywood. This is all of it. Panel C's deck, the kitchen box,
the battery drawer, the front wall, the fridge tray, the ripped 3/4" bearer cleats and the
anchor board — the entire build's plywood, out of one 3/4" sheet and one
1/2" sheet. Note they're standing on edge, not stacked flat: ply left in a pile on
a garage slab picks up a bow from its own weight, and the deck and front wall are the two parts
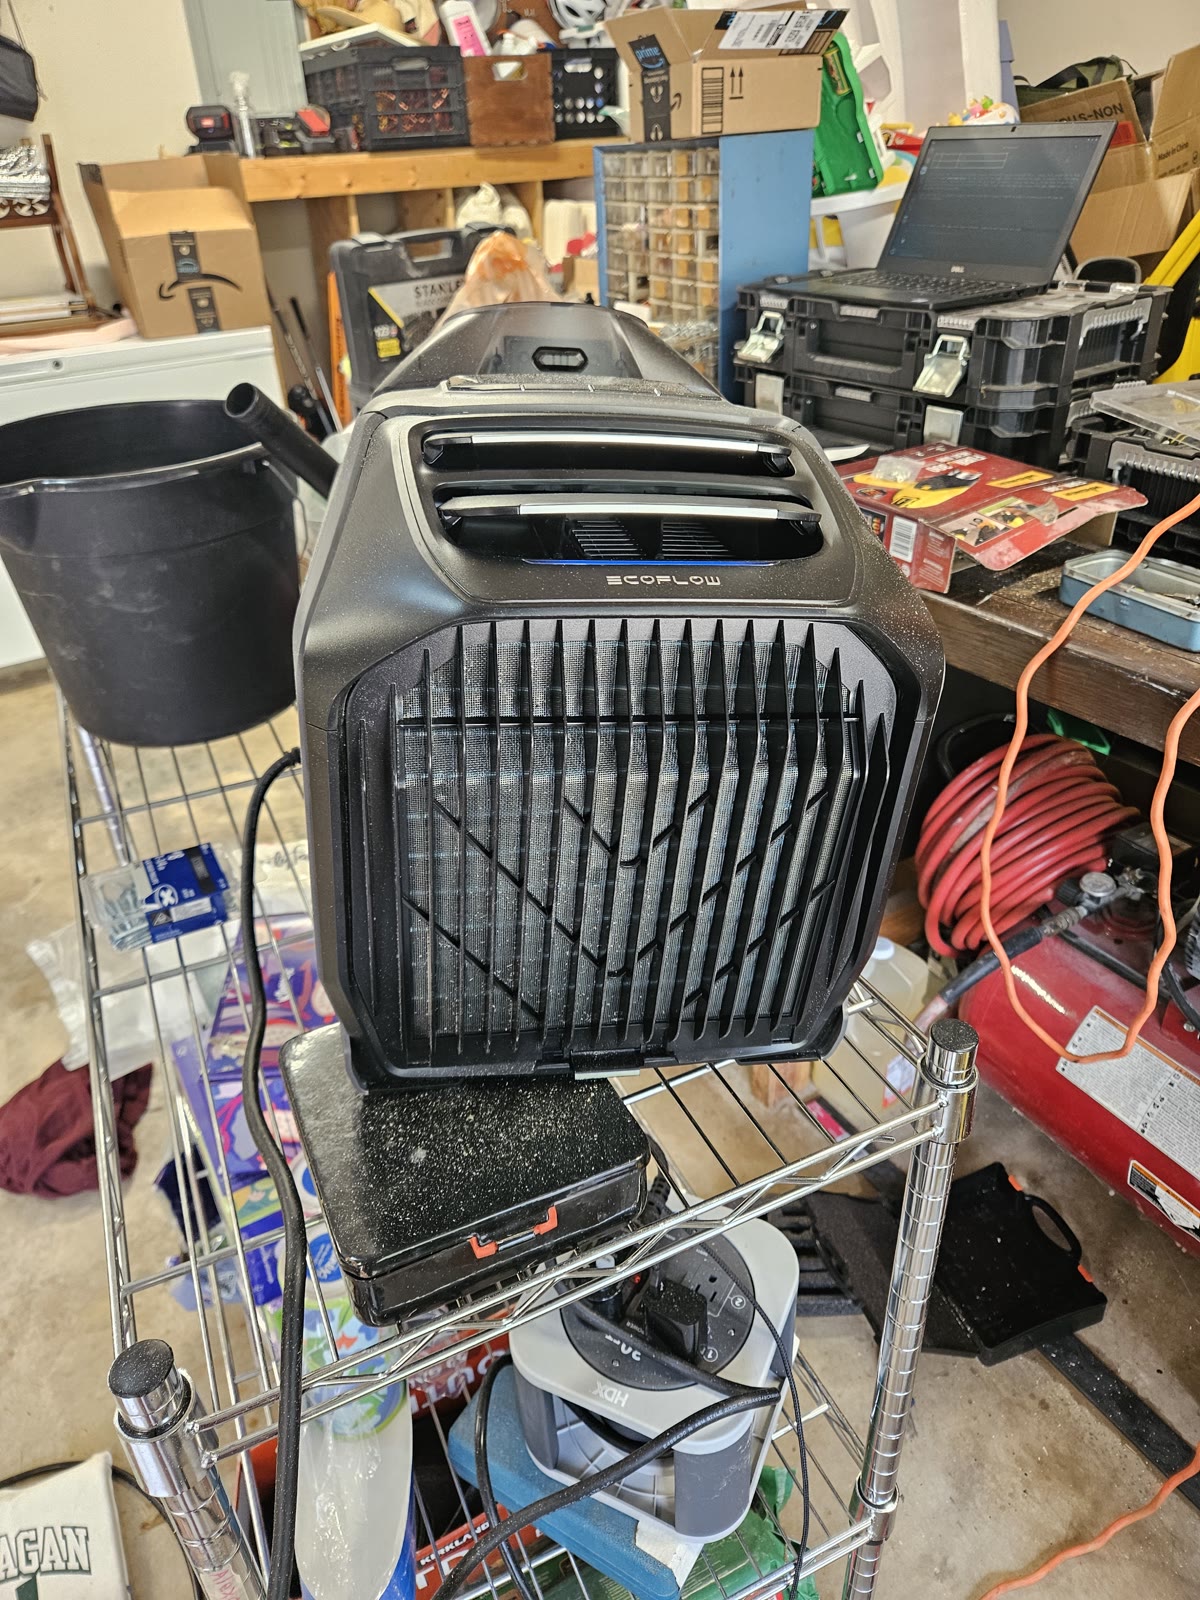
that have to stay flat.The air conditioner earned its keep before it was ever installed. The same
WAVE 3 this build carries spent the cut days cooling the garage, stacked on its battery
exactly the way it sits in the van. That's a free rehearsal: it's where you find out how loud it
really is, how long the battery lasts at your ambient, and how much clearance that rear intake
grille actually wants behind it — the number that sets the size of its bay in
Panel A.The switch the retrofit adds, sitting in a blank in the factory bank next to the
AC 120 V inverter button. It folds the mirrors on demand, independent of locking
and unlocking the car.Bought, not yet installed. The WAVE 3 on the left; the DELTA 3 Plus stacked on
its Smart Extra Battery on the right — the 2048 Wh pair the power planner sized. This is
the entire power and climate side of the build standing on a floor indoors, waiting on
Panel A — whose frame is now built (photos above), though the drawer slide the
DELTA 3 rides on and the WAVE 3's vent kit are still just line items in the parts list
below.Also bought, also waiting on a panel. The BougeRV compressor fridge, out of the
box and sitting on the driveway rather than in the van. It's a Panel C appliance: it pulls
straight out the open tailgate on locking slides, so the number that matters when the panel is
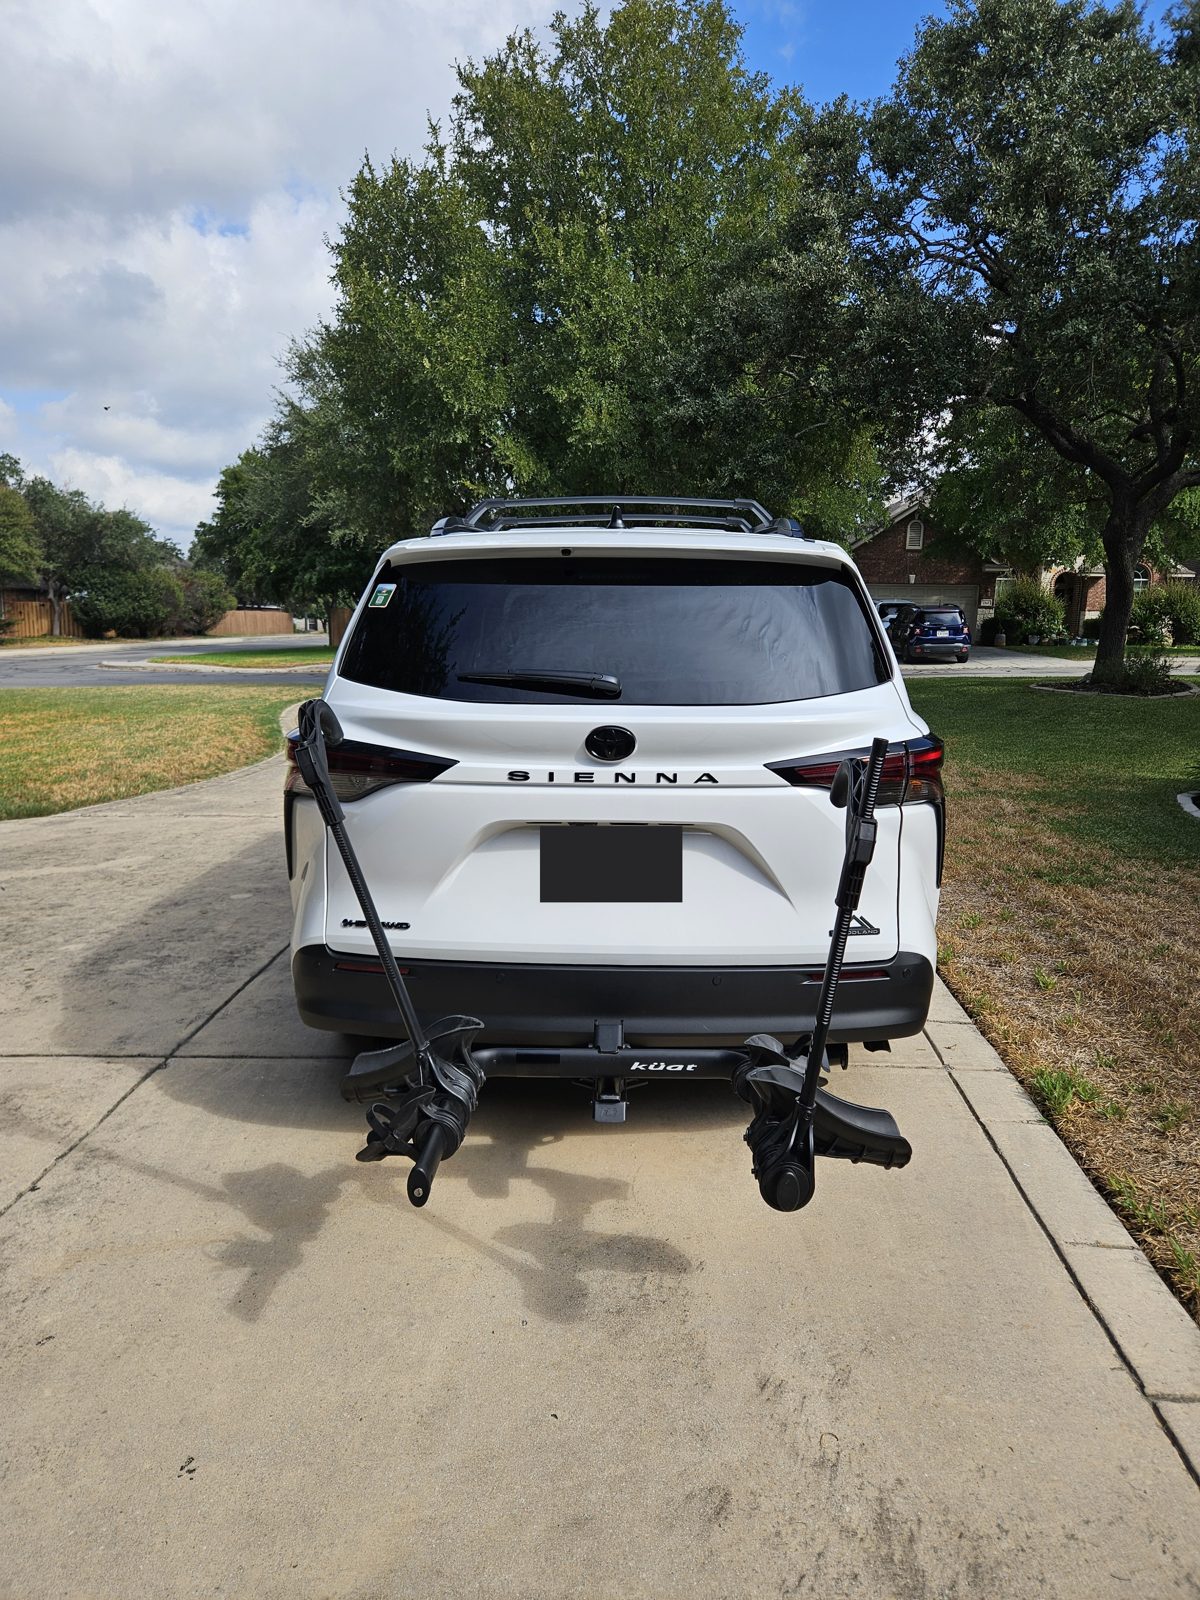
built is the slide's extension, not the fridge.It blocks the camper. We're carrying the bikes anyway. A Küat hitch rack
on the 2" receiver, photographed empty. Loaded, it stands directly in front of the tailgate,
and both Panel C appliances — the fridge and the camp kitchen — slide straight out
the back. We've run it with an e‑bike, and it does block that access; there's no clever
angle that solves it. The answer is simpler and slightly annoying: at camp the rack comes off and
gets locked to a picnic table or another fixed object, and the tailgate is yours again. Getting
the bikes to the trip is worth the two-minute swap.
More photos land here as each module gets built — panels, the fridge and kitchen slides, the anchor board, and the first night out.
Which van this is
Every number on this page and in the plan was measured on a fourth-generation Toyota Sienna Woodland Edition —
the 2021–present generation that replaced the 2011–2020 third gen. It rides on Toyota's TNGA‑K
platform and is hybrid-only: every trim in this generation is the 2.5 L hybrid, with no gas-only
option. The van was surveyed on August 1, 2026, and the plan's dimensions come from that survey
rather than from a spec sheet, because published interior figures rarely match what a tape measure finds
between the trim panels.
If you have a third-gen Sienna (2011–2020) or another minivan, the layout still works but the
anchoring does not transfer. That is the part to check before you copy anything.
What is specific to this generation
The no-drill anchor. Two steel tongues run forward from the anchor board and pin into the rear
ends of the second-row super-long-slide floor rails — the 25″ sliding rails this
generation introduced. Measured 42″ from the hatch, 17.5″ apart. Earlier Siennas do not have
these rails, so the whole forward load path would need rethinking.
The third-row striker loops that take the three ratchet straps, measured 44.5″ from the hatch.
The rear 120 V outlet — and this one is specific to the trim, not just the
generation. The 1500 W inverter that feeds it is standard on the Woodland Edition and
optional on XLE and above. Lower trims don't have it at all. Ours is a Woodland, so the outlet
is there to charge the battery stack from — but if you're planning around one, check your own
van before you count on it.
No factory spare. This generation ships without one, which is why a full spare-and-jack kit is
the single biggest line on the parts list.
Seat removal and the SRS emulators. Connector type is specific to the platform, and the second
row here is the long-slide chair, not a bench.
Sienna-fit accessories — the eight-piece window shade set, the console tray, and the
sliding-door hinge covers are all cut for the 2021–2026 body.
What transfers to any vehicle
The three-module lift-out platform idea, and the leg-and-leveling-foot system under it — twelve
3/8‑16 adjustable feet driven into threaded inserts, adjusted at the floor rather than shimmed.
The 12 V fridge bay: thermostat-controlled fans, low intake and low exhaust vents, and a fused
DC line with seam disconnects so the modules still lift out.
Choosing induction over propane — no combustion, no tank, no CO risk — and the power budget
that decision forces.
Most of the parts list. Slides, brackets, straps, raceway, fasteners and tools are all generic.
The power-folding mirror retrofit
The one job on this build that took a full day, and the one fix that
isn't written down anywhere else. Every part is in the parts list below; this is what
actually happened.
The thread fourth-gen owners have been fitting these kits in since 2022: which kits
people actually bought, what the wiring looks like on the way in, and the roughly
5 hour install time quoted there. Worth reading before you order — fitment and
kit contents vary a lot between sellers. Our install report is a reply in that thread;
everything below is the longer version of it, with the photo.
The kit we fitted:power-folding mirror kit for the 2021–2026 Sienna, on eBay
— the same listing as in the parts list below. Fitment and kit contents vary a lot
between sellers: some replace the whole mirror assembly, others are only the fold module
for mirrors that already have the motor. Read the listing against your own trim before
ordering, and if it has ended, the eBay search finds the current ones.
Why bother. The fourth-gen Sienna doesn't fold its mirrors on the lower trims,
and a minivan is already wide. Folding them in matters more than it sounds once you're
parked overnight on a narrow forest road, squeezing past a gate, or lined up for a car
wash. The kit adds a button in a blank in the factory dash bank, so the mirrors fold
on demand and not only when the car locks.
It took about 7 hours, and three things ate the time. The video supplied by the seller was
created on an older generation — close enough to follow, but it will not match
your doors. And the step that actually beat us was feeding the
harness through the rubber boot between the door and the body; we paid an installer
for that pass-through alone. The connectors really are plug-and-play. The boot is the job.
The mirrors folded backwards, and it looks exactly like a dead kit
Ours came up wrong: lock the car and the mirrors swung out instead of in. That
reads as a broken kit, and it isn't. The motor polarity is reversed, and the
seller's own support confirmed the fix — unplug the two-wire connector and swap the
two wires. Their support answered both of our emails within hours, which is worth
something on a kit like this.
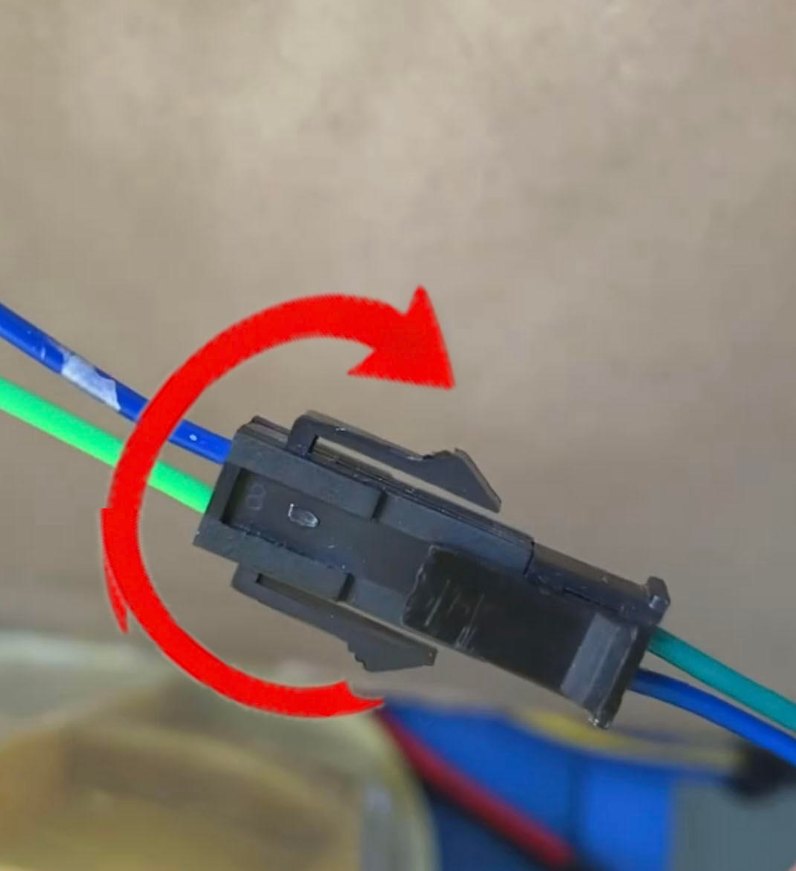
This is what correct looks like. Blue meets green across the joint,
because the connector has been flipped. If the colors still match end to end, you
haven't changed anything. Swap one end of the run only — do it at both
and the two cancel out, and the mirrors still fold backwards. Add electrical tape once it's back
together — the clips don't hold when the connector is reversed. Photo: the seller's support team.
Three things to get right, and the second one is the one that makes people undo
their own fix:
Swap at one end of the run only. Do it at both and you have swapped it back.
The wire colors will no longer line up across the joint, and that is correct.
Matching colors there means nothing has changed. This is the step that feels wrong
while you are doing it.
Tape the joint. The connector's latch will not engage once it's flipped, so
the clip is no longer holding anything. Electrical tape around the joint is the fix
— don't trust the clip to do a job it can no longer do.
Front to back, the van reads: front seats → Panel A → Panel B → Panel C → open tailgate. All three panels are open plywood frames on legs, and none of them is fastened to the van. They drop in, then get clamped into a single rigid beam by over-center draw‑latches at each seam, with alignment dowels for registration and felt strip to kill rattle.
Panel A (front) carries the EcoFlow stack — a DELTA 3 Plus on a locking drawer slide on the right, a WAVE 3 air conditioner in an open bay on the left. Panel B is a bare-frame deep-storage bay: the side doors don't reach it, so it has no drawers and loads from above by lifting out either half of its two-piece top. The full-size spare and its jack kit stow flat down there, at the axle. Panel C (tailgate end) is the working end — a 12 V compressor fridge and a slide-out camp kitchen on heavy-duty locking slides that pull straight out the back, a shallow kitchen drawer in the dead air above them, and a prefab drawer cluster as the rear pantry sitting on its deck.
The panel tops land in one flush plane at 18.5", giving 79¼" of continuous sleeping length for a 78 × 50 × 4" foam mattress. Fridge and cooling fans run off the DELTA 3 on their own DC line, so they keep running with the van locked and the ignition off; the induction cooktop runs off the DELTA 3 rather than the van, so cooking doesn't depend on the ignition; the van's rear 120 V outlet is there to charge the stack back up, two short cords away.
Two decisions worth stealing
No drilling, ever. Everything that restrains load ties back to hardpoints the van already has: two steel tongues run forward from a plywood anchor board and pin into the rear ends of the second-row long-slide floor rails, and three ratchet straps drop into the crash-rated third-row striker loops. Nothing is bolted through the floor pan, so the van goes back to being a van in an afternoon.
Leveling lives at the floor, not in the frame. Every one of the twelve legs ends in a 3/8‑16 adjustable foot with ±½" of travel, driven into a threaded insert in the end grain. Tip a corner, turn the foot's hex collar, done — no shimming, and nothing boxes a foot in. Site leveling still happens at the wheels with blocks; that's what the leveling block calculator is for.
Free tools that came out of this build
Most of the calculators on this site exist because a question came up mid-build and there was no good answer online. They're free, need no signup, and run entirely in your browser — they keep working at a campsite with no signal.
Everything bought for this build, with the price actually paid in July–September 2026 — not a list price, and not an estimate. Prices move; treat these as what a build like this really costs, not as a quote.
Two rows are marked current price. Those tools were picked up mid-build rather than ordered, so instead of a price we paid, their rows link straight to the listing — they're the two tools people ask about most, and worth having before you start.
—spent so far, across — of the
— parts below. The rest are either still to buy or were
picked up in a store without a receipt worth quoting. Prices are what we paid in
July–September 2026, tax not included.
The tool this job actually needs. The threaded insert's own drive is 10 mm (1 cm) — not 3/8", not 7/16" — and it's the one tool on the list you're least likely to have out already. This set covers 1.5–10 mm plus the SAE sizes, in chrome-vanadium with a case. Long arm matters: you need the leverage to start an insert square into end grain, and a stubby key will not give it to you.
The best decision on the build: the custom plywood pantry was replaced by four bought drawer units, stacked two wide and two high on Panel C's deck and held by a cleat pocket and one cam strap. Nothing to build, about 27 lb lighter, and each unit lifts straight out. Match the size, not the brand — 12.1 × 14.3 × 8.4" per unit is what the deck depth was drawn around, so measure before you order.
Two over the kitchen unit into its own notches, three forward into the third-row striker loops. These are the straps holding the whole platform to the van.
A Sienna doesn't come with a spare. This one stows flat in Panel B right at the axle, where the weight belongs. The single biggest line on the list, and the least negotiable.
Deliberately short. The battery stack sits a couple of feet from the van's rear
120 V outlet, so the charging run needs almost no cable — a long cord would just coil
somewhere and get stepped on.
Bought rather than built — a plywood galley with a sink, a folding table and its own slide would have taken weeks and come out heavier. 26 × 20 × 11.8" closed, and it has four of its own strap notches and D‑rings.
28 × 17.7 × 15.8", 40.6 lb, 60 W max, reversible lid. Bought direct from the manufacturer — a launch coupon took $27.99 off the $399.99 list, which beat every marketplace price we found. Learn from our mistake: a 30‑quart was ordered on Amazon first and had to go back — measure your fridge bay before you order, not after.
Induction over propane: no combustion, no CO, no tank, and it drops straight onto the kitchen's stove tray. 18.1 × 9.1 × 4.3". Check the headroom, not just the circuit. At 1800 W it sits exactly on the DELTA 3 Plus's
1800 W rated output, so the fridge compressor cycling on the same battery can tip it over; and
the van's 1500 W inverter can't refill faster than the hob empties, so cooking is always a net
drain. Roughly 450 Wh for a 15-minute cook — about a fifth of a 2048 Wh stack.
And using one burner doesn't help: the 1800 W is a shared budget across both
hobs, not 1800 W each, so a single pan can draw the whole lot. This is the part of the build
we'd buy differently — see the next row.
What we'd buy again in its place. The problem with a cheap induction hob on
battery isn't the peak wattage — it's that most of them fake their low settings by pulsing
full power on and off, so "turn it down to half" still slams 1800 W at the battery
several times a minute. The 9600LS is genuinely variable: its 20 steps run 100–1800 W
and it holds the one you pick. FarOutRide measured level 5 at a steady 820 W.
Why that matters here: set it around 1200 W and two problems disappear at once —
you keep ~600 W of headroom under the DELTA 3 Plus's 1800 W output for the fridge and fans,
and you're drawing less than the van's 1500 W inverter can push back in, so with the
engine running you're charging while you cook instead of draining. 11.4 × 14 × 2.5",
5 lb 12 oz, 5 ft cord. Measure first: it's 14" deep against the 2‑burner's
9.1", so check it against your stove tray before ordering.
The heart of the build. The DELTA 3 Plus is a 1024 Wh base station running the fridge, the cooling fans, the induction cooktop and one
power strip — everything in the build draws from it rather than from the van; the WAVE 3 is a 6100 BTU air conditioner and heater in one box, quiet enough to sleep next to. Buying them as a bundle beat buying the two separately by a wide margin. The power planner is how this got sized.
Another 1024 Wh, chained to the Plus for 2048 Wh total. Running an air conditioner overnight is what makes the second battery necessary rather than nice — the base station alone will not see you through a hot night.
The part that makes a portable air conditioner work in a vehicle at all: a window seal with duct pass-throughs, so the hot exhaust goes outside instead of straight back into the van. Ordered separately, and the piece most people forget.
Doubles the living space off the open tailgate and stands alone on the ground. A pole-frame tailgate tent was tried first and went back — inflatable pitches faster in the dark, by one person. How we pick a site for it and set it up →
Rated for electrical, textile and grease — the three fires a camper van can actually have. Mount it where you can reach it from the bed and from outside.
The part that makes seat removal legal-feeling instead of nerve-wracking. Pulling the second-row seats leaves the airbag and seatbelt-pretensioner circuits open, and the SRS module reads an open circuit as a fault: warning light on, stored codes, and a system you no longer trust. Each emulator presents the 2.2 Ω the module expects, so it sees a healthy circuit. Connector type is the thing to get right — they're sold by connector, not by vehicle. Four units covered our two seats: two round, two square. Check yours against the seller's compatibility table before ordering, and confirm the light stays out and no codes are stored before you drive it.
The fourth-gen Sienna doesn't fold its mirrors on the lower trims, and a minivan is already wide. Folding them in matters more than it sounds once you're parked overnight on a narrow forest road or squeezing past a gate. The switch is the part worth buying it for. It lands in a blank in the factory dash bank and folds the mirrors on demand, independent of locking and unlocking — so it's there for a tight garage entrance or a car wash, not only when you're parked up for the night. Fitment and kit contents vary a lot between sellers — some replace the whole mirror assembly, others are only the fold module for mirrors that already have the motor — so read the listing against your own trim before ordering. What it takes to fit: about 7 hours here, and worth
knowing where that goes. The video supplied by the seller was created on an older generation — close
enough to follow, but don't expect it to match your doors. The step that actually beat us was feeding
the harness through the rubber boot between the door and the body; we paid an installer for
that pass-through alone. The connectors really are plug‑and‑play; the boot is the job.
If your mirrors fold the wrong way — ours did, and it looks exactly like a dead kit
— nothing is broken. The motor polarity is reversed, and the seller's own support confirmed
the fix: unplug the two-wire connector and swap the two wires. Three things to get right.
Swap at one end of the run only — do it at both and you've swapped it back.
The wire colors will no longer line up across the joint, and that is correct; matching
colors there means you haven't changed anything. And the connector's latch won't engage
once it's flipped, so tape the joint rather than trusting the clip. Support answered both
of our emails within hours, which is worth something on a kit like this. If the listing above has ended, the search beside it finds the current ones.
Unglamorous, and the difference between a tidy van on day four and a bad mood.
$7.99
U‑Haul 2" receiver hitch, professionally fittedbought direct
A 2" receiver, fitted by U‑Haul in August 2026 rather than in the driveway — $199.95 for the receiver, $80.00 labor, $5.00 for their hitch warranty. Worth paying for: the fourth-gen Sienna is a unibody hybrid, and the exhaust and underbody routing back there is not somewhere to improvise. This is the only thing on the list bolted to the vehicle's structure, which sits oddly next to a build whose whole premise is no new holes — but it's a factory-pattern install by the shop that warranties it, not a modification of the cargo area.
Platform rack for the 2" receiver above, with an integrated cable lock. It blocks the tailgate — the fridge and the camp kitchen both slide straight out the back, and a loaded rack stands in the way. So at camp the rack comes off and gets locked to a picnic table; carrying the bikes is worth the swap. Check the per-bike limit before you load an e‑bike: the dedicated 2" carries 60 lb per bike, the 1.25"/2" only 40 lb. Ours weighs 55 lb on a scale, against published figures of 66 — weigh yours. ⚠ Recall: read the serial sticker before you use any Transfer v2. Batches 2045–2414 are affected and ours is one of them, bought new in 2026. Free repair kit.
The 48‑89‑9222 kit — a #1 and a #4 jam-free step bit plus eight 1/16–3/16" twist bits. Step bits are what you want for the vent holes, grommet pass-throughs and every sheet-metal or thin-panel hole on a build like this: one bit walks up through a range of sizes and leaves a clean round hole instead of the triangle a twist bit chews in thin stock.
Every curve, every inside corner, and the fillets that keep the one-piece anchor board from tearing. Corded on purpose — no battery to run flat mid-cut.
Trimming bolts flush and cutting the L‑track stock down to length.
$19.52
S'more's Outdoors may include Amazon and other affiliate links; if you buy through one, we may earn a commission at no extra cost to you. Prices shown are what we paid in July–September 2026 and are not current quotes. S'more's Outdoors is an independent publisher and is not affiliated with, sponsored by, or endorsed by any manufacturer, vehicle maker, brand, or retailer whose products or trademarks appear on this page; all product names and trademarks are the property of their respective owners.
Before you copy any of this
This is a build log, not engineering guidance. Everything on this page is what worked for one specific vehicle, measured on that vehicle. Two things in particular deserve your own judgment:
Restraint is the safety-critical part. A loaded platform in a minivan is a few hundred pounds behind your head. Anchor points, straps and their working load limits should be verified against your own vehicle's hardpoints and your own load — not copied from a web page. Rated hardware with published numbers is worth the extra money every time.
Check the recall on your bike rack. Küat has an open recall on the Transfer v2 pivot pedal: the cams can disengage and drop the carrier, loaded, in traffic. It covers racks built 1 November 2020 to 24 May 2024, batches 2045–2414, read from the first group of digits on the serial sticker. The rack on this van is one of them — bought new in 2026, built in 2023. A purchase date tells you nothing; stock sits in warehouses for years. Read the sticker before you load it, and get the free repair kit.
A hitch rack loads the rear axle harder than the same weight inside the van. Its mass hangs well behind the receiver, and this build is already rear-biased. Check the rear GAWR on your own door-jamb sticker, and your hitch's accessory rating — which is not the same number as its trailer tongue rating. Check the rack's per-bike limit too, and weigh the bike rather than trusting a published figure.
Removing seats changes your vehicle. Second-row seat removal on a Sienna involves the SRS airbag system, and re-installing seats incorrectly is its own hazard. Know your local regulations on seating positions and belts before you start.
What's coming
New photos and progress go up here as the build moves. Panel A's frame is up; next are the other two panel frames and the no-drill anchor board — the part that decides whether this thing is safe.
Got a question about a decision on this page, or want a tool built for something the build ran into? Get in touch, or use the tool-idea form on the home page — several of the calculators on this site started exactly that way.
We're making some of this gear
A few things this build kept running into don't exist the way we wanted them, so we're having them made — campfire and camp-kitchen gear, same idea as everything else here: fix what actually annoys you at a campsite and don't over-build the rest.
Nothing's for sale yet and it may be a while — real manufacturing is slow. If you want to know when it is, leave your email. One message when there's something to buy, and nothing else.